Quantcast
Channel: GARYTOWN ConfigMgr Blog
Viewing all 206 articles
Browse latest View live

ConfigMgr Delete Cached Items

$
0
0

The CCMCache is pretty good at taking care of itself, but perhaps you have a reason to delete something specific, how do you do that in a supported way?

I have two scripts below, one that will just blow away ALL Software Updates in the cache, thoughts behind this, software updates should be installed within a couple weeks of being cached, after that, they are useless and never needed again, the other reason, if I’m upgrading to a new Windows 10 Build, I don’t need any of those old Windows 10 Software Updates in my cache anymore. (yes, you probably have others in there from office, etc, but hopefully you've installed them already, I admit, this isn't for everyone) Script Name:
Remove-CCMCacheSoftwareUpdateContent.ps1

Script 2, delete specific items based on ContentID.  This is more for when you have a package / app you just want gone, perhaps you’re never going to deploy it again, or perhaps, someone accidently put a domain admin username & password in the script that’s now in the package sitting on all of our workstation ccmcache’s.  Instead of dumping the entire cache, you can target a specific content and delete it.  I also use this for deleting the Windows 10 Upgrade Media from the CCMCache after the upgrade.  Normally you wouldn’t need to clean up after your task sequence, but if you precache your payloads into the ccmcache to speed up your actual deployment, then you’ll have that package contents just taking up space. Script Name:
Remove-CCMCacheContent.ps1

Flipside, Reasons to just leave it alone…  once you fill up your CCMCache, it’s YOURS!  You own that 20GB or whatever your CCMCache size is.  No one can take that space away from you again.  If you clear it out, sure, your machine might have more available free space, then the user steals it with cat videos, and guess what, when you need to cache that Adobe Software install, you can’t, not enough storage on the machine, if you would have just left the cache full, it would have cleared out what it needed at the time of the request, and pulled down the installer content.

How am I using them?

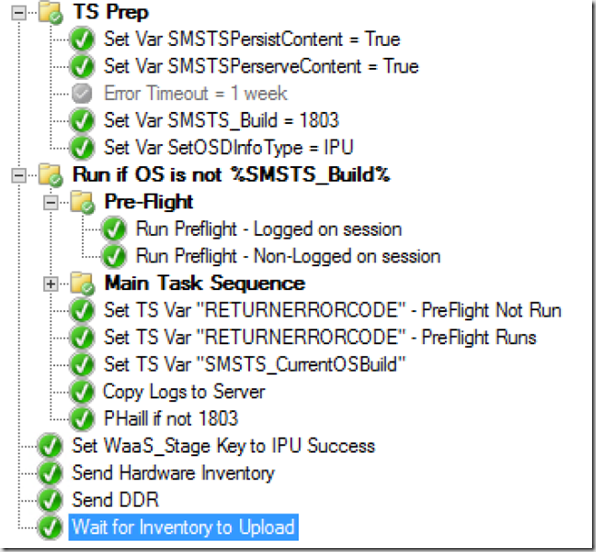
I have a script that will dump all of the Software Updates in the Cache, I use it in my Upgrade TS if after several other remediation's, still don’t have 20GB free space to start the Build upgrade.
imageimage

The other one, I have it clean up a couple packages at the end of the TS that are in the CCMCache from the PreCache TS:

image

Script is set to create a log in c:\windows\temp\ you can modify this to whatever you like.

Remove-CCMCacheSoftwareUpdateContent.ps1

<#
.SYNOPSIS
Delete Specified Item(s) From CCM Cache
.DESCRIPTION
Uses ContentIDs to identify (ALL SOFTWARE UPDATES) and purge content from the local ccm cache - Created by Gary Blok @gwblok
Partial Code borrowed from: https://gallery.technet.microsoft.com/scriptcenter/Deleting-the-SCCM-Cache-da03e4c7
Assist by Keith S. Garner @keithga1
.LINK
https://garytown.com
#>

$Logfile = "c:\windows\temp\Remove-CCMCacheContent.log"
# Connect to resource manager COM object
$CMObject = New-Object -ComObject 'UIResource.UIResourceMgr'

# Using GetCacheInfo method to return cache properties
$CMCacheObjects = $CMObject.GetCacheInfo()

# Delete Cache item
$CMCacheObjects.GetCacheElements() | Where-Object { $_.ContentID | Select-String -Pattern '^[\dA-F]{8}-(?:[\dA-F]{4}-){3}[\dA-F]{12}$' }   | ForEach-Object {
    $CMCacheObjects.DeleteCacheElement($_.CacheElementID)
    Add-Content $Logfile -value "Deleted: Name: $($_.ContentID)  Version: $($_.ContentVersion)"
    Write-Host "Deleted: Name: $($_.ContentID)  Version: $($_.ContentVersion)" -BackgroundColor Red
}

Remove-CCMCacheContent.ps1

<#
.SYNOPSIS
Delete Specified Item(s) From CCM Cache
.DESCRIPTION
Uses ContentIDs to identify and purge content from the local ccm cache - Created by Gary Blok @gwblok
Partial Code borrowed from: https://gallery.technet.microsoft.com/scriptcenter/Deleting-the-SCCM-Cache-da03e4c7
Assist by Mark Godfrey @Geodesicz
.PARAMETER CachItemsToDelete
Comma separated values for the Content ID(s) of the cach item(s) to delete
.EXAMPLE
.\Remove-CCMCacheContent.ps1 -CacheItemsToDelete "PS100123","20eb8ec8-0b7e-4831-a5ae-95680b11e6b5","PS111197"
.LINK
https://garytown.com
#>

[CmdletBinding()]
Param(
    [Parameter(Mandatory=$true,Position=1,HelpMessage="ContentIDs")]
    [ValidateNotNullOrEmpty()]
    [String[]]$CacheItemsToDelete
)
#$CacheItemsToDelete = "PS100002","20eb8ec8-0b7e-4831-a5ae-95680b11e6b5","decbb5fe-1cbc-4984-bbf2-e76347150135"

$Logfile = "c:\windows\temp\Remove-CCMCacheContent.log"
# Connect to resource manager COM object
$CMObject = New-Object -ComObject 'UIResource.UIResourceMgr'

# Using GetCacheInfo method to return cache properties
$CMCacheObjects = $CMObject.GetCacheInfo()

# Delete Cache item
$CMCacheObjects.GetCacheElements() | Where-Object {$_.ContentID -in $CacheItemsToDelete} | ForEach-Object {
    #$CMCacheObjects.DeleteCacheElement($_.CacheElementID)
    Add-Content $Logfile -value "Deleted: Name: $($_.ContentID)  Version: $($_.ContentVersion)"
    Write-Host "Deleted: Name: $($_.ContentID)  Version: $($_.ContentVersion)" -BackgroundColor Red
}

In Action:
image
as you can see, it deletes every version of the content id. AKA, if the client cached version 1 of the package, then you updated the package with a new file, the client could then download version 2 of the same package.  Running this script will dump every version of that same package.

Feel free to use them however you want, I just tend to live in the Task Sequence world now, so that's how I use them.

Thanks to Mark Godfrey, Keith Garner & the PS Gallery, see actual scripts for more details.


ConfigMgr Lab - Adding Ninite Apps

$
0
0

So you have a Personal ConfigMgr lab, but you want to add some app deployments to better simulate your actual environment.  So you add Chrome, Reader, and a couple others (NOT JAVA).  Next Month, they are out of date.  You probably don’t have time to keep your personal lab app deployments updated, so you keep deploying old versions.  How about, you leverage ninite.com’s ability to dynamically install the latest version of the app every time?  Now you're asking, "Isn't the command line version that supports silent install cost money?"  Yes, yes, it does, to use ninite’s silent install, you need the Pro version.  What, you don't want to pay for pro when it’s your personal lab?  I hear you.  Powershell to the rescue!  It doesn’t make it completely silent, but it will allow you to automate it to work with the ConfigMgr App Model during OSD and Post OSD.

If you're not familiar with Ninite.com, it's pretty awesome.  I've been using it for years, when I get a new computer, or just want to make sure my apps are updated.  Also use it to help setup how many friend's and family's computers. Basically, you go to the website, you check the box next to the app(s) you want, and click "Get your Ninite".  Then run the small stub installer file.  Awesome right?  They figured out all of the command lines. They keep the apps updated. They make it so easy.

Please remember, this is for your personal lab, if it is for anything other than personal use, you’d have to get the Pro version.  With the Pro version, you don't need my work around.

Basically my solution is a powershell wrapper that downloads the ninite stub installer,  runs the installer, waits for it to finish, then kills the installer dialog box.  Why would you want to do this?  Automation, being able to leverage Ninite's Free Personal installers in the context of a Task Sequence or App Model deployment in your Personal ConfigMgr Home Lab.

The Script does this:

  1. You choose the App you want to install from the predefined list built into the script
  2. The script then Downloads the Ninite.exe stub file from Ninite.com
  3. Then launches the Ninite Installer.exe stub file which downloads the actual app installer and launches
  4. Waits for either MSIEXEC.EXE or TARGET.EXE Subprocess of Ninite.exe to start.
  5. Monitors the SubProcess (MSIEXEC.EXE or TARGET.EXE)
  6. Once SubProcess (software install) completes and goes away, Sends “Stop-Process” signal to stop all Ninite.EXE processes
  7. Deletes the file it downloaded
  8. DONE.

In Software Center (Application Model Deployment).  It will Launch the installer, the ninite dialog box will be visible until it is complete. (See video below for demo

image

In the TS, you can add the Applications like any other.  During at TS, the installers are not visible. (See video below for demo)

image

Content: One PowerShell Script

Same Command Line Install for each, just change it to match the software.

powershell.exe -executionpolicy bypass -file "NiniteInstall.ps1" -NiniteApp 7Zip -Invoke Install
powershell.exe -executionpolicy bypass -file "NiniteInstall.ps1" -NiniteApp 7Zip -Invoke Uninstall

Detection Method (File Only) - I don't use version number, as it's constantly changing.  If you want to rerun the app, uninstall it first, then rerun to get the updated version.  However, assuming this was a lab, I made the assumption the machines you're installing apps on, probably won't "live" for long before blown away or reloaded.
image

PS Code

#Ninite Installer Script
#Downloads Ninite Installer based on Input
#Currently Supports a few different apps, feel free to add others
#Supports Install & Uninstall

[CmdletBinding()]
Param(
[Parameter(Mandatory=$true,Position=1,HelpMessage="Application")]
[ValidateNotNullOrEmpty()]
[ValidateSet("7Zip", "Chrome", "FileZilla", "Firefox", "GreenShot", "VLC", "VSCode", "WinDirStat")]
[string]$NiniteApp,

    [Parameter(Mandatory=$true,Position=2,HelpMessage="Install or Uninstall")]
[ValidateNotNullOrEmpty()]
[ValidateSet("Install", "Uninstall")]
[string]$Invoke
)

Write-Host $NiniteApp
Write-Host $Invoke

#Timeout if things are taking too long, odds are good something was too quick for process to monitor, so this is here to make sure it doesn't hang.  15 Minute Timeout, unless the app specifies otherwise.
$AppTimeout = "901"

#Set Information Per App to be used laster
#Download & Process Info

if ($NiniteApp -eq "7Zip")
{
$downloadlink = "https://ninite.com/7Zip/ninite.exe"
$uninstallstring = '"C:\Program Files\7-Zip\Uninstall.exe" /S'
$AppTimeout = "300"
}
if ($NiniteApp -eq "Chrome")
{
$downloadlink = "https://ninite.com/chrome/ninite.exe"
$uninstallstring = "wmic product where name=""Google Chrome"" call uninstall"
}
if ($NiniteApp -eq "FileZilla")
{
$downloadlink = "https://ninite.com/FileZilla/ninite.exe"
$uninstallstring = '"C:\Program Files\FileZilla FTP Client\uninstall.exe" /S'
$AppTimeout = "300"
}
if ($NiniteApp -eq "Firefox")
{
$downloadlink = "https://ninite.com/FireFox/ninite.exe"
$uninstallstring = '"C:\Program Files\Mozilla Firefox\uninstall\helper.exe" /S'
}
if ($NiniteApp -eq "GreenShot")
{
$downloadlink = "https://ninite.com/GreenShot/ninite.exe"
$uninstallstring = '"c:\windows\system32\taskkill.exe" /IM greenshot* /F & "C:\Program Files\Greenshot\unins000.exe" /SILENT'
}
if ($NiniteApp -eq "VLC")
{
$downloadlink = "https://ninite.com/VLC/ninite.exe"
$uninstallstring = '"C:\Program Files\VideoLAN\VLC\uninstall.exe" /S /NCRC'
}
if ($NiniteApp -eq "VSCode")
{
$downloadlink = "https://ninite.com/VSCode/ninite.exe"
$uninstallstring = '"C:\Program Files\Microsoft VS Code\unins000.exe" /SILENT'
}
if ($NiniteApp -eq "WinDirStat")
{
$downloadlink = "https://ninite.com/WinDirStat/ninite.exe"
$uninstallstring = '"C:\Program Files (x86)\WinDirStat\Uninstall.exe" /S'
$AppTimeout = "300"
}

if ($Invoke -eq "Install")
{
#Download the Ninite File
Invoke-WebRequest -Uri $downloadlink -OutFile $PSScriptRoot\NiniteInstaller.exe -UseBasicParsing -Verbose

if (!(test-path $PSScriptRoot\NiniteInstaller.exe))
{
Write-Host "Did not download, Exit Script"
exit
}

#Launch the Ninite Installer

start-process -FilePath "$PSScriptRoot\NiniteInstaller.exe"
$Y = 1
While(!(Get-WmiObject win32_process -Filter {Name =  'Ninite.exe'}) -and $Y -lt 10){
    Write-Output "Waiting for ninite.exe to download and launch"
    Start-Sleep -Seconds 1
    $Y++
}
#If internet connection not working right, it might not download
If ($Y -ge 10)
{
Write-Host "Did not download, Exit Script"
Get-Process | Where {$_.Name -like "ninite*"} | Stop-Process -Verbose
exit
}

#Monitor Install Process

    $PIDs = (Get-WmiObject win32_process -Filter {Name = 'Ninite.exe'}).ProcessID
    Write-Host "Ninite Process IDs" $PIDs

    $MSIRunning = (Get-WmiObject win32_process -Filter {Name = "msiexec.exe" or Name = "Target.exe"} | Where-Object {$PIDs -contains $Psitem.ParentProcessID}).ProcessID
    $X = 1
    while  ($MSIRunning -eq $null -and $X -lt "$AppTimeout")
    {
        $X++
        start-sleep -Seconds 1
        Write-Host "Waiting for Software Installer to Start"
        $MSIRunning = (Get-WmiObject win32_process -Filter {Name = "msiexec.exe" or Name = "Target.exe"} | Where-Object {$PIDs -contains $Psitem.ParentProcessID}).ProcessID
    }
    Write-Host "Installer Started"
    Write-Host "Waiting for Software Installer To Finish"
    $ParentPID = (Get-WmiObject win32_process -Filter {Name = "msiexec.exe" or Name = "Target.exe"} | Where-Object {$PIDs -contains $Psitem.ParentProcessID}).ProcessID
    $ParentProc = Get-Process -Id $ParentPID
    $ParentProc.WaitForExit()
    Write-Host "Software Install Finished"


#Kill Task on the Ninite Installer
start-sleep -Seconds 5
Write-Host "Kill Ninite Wrapper"
Get-Process | Where {$_.Name -like "ninite*"} | Stop-Process -Verbose

}
if (test-path $PSScriptRoot\NiniteInstaller.exe)
{
start-sleep -Seconds 2
Write-Host "Delete Ninite Installer"
Remove-Item "$PSScriptRoot\NiniteInstaller.exe"
}

#Run the Uninstall if in Uninstall Mode
if ($Invoke -eq "Uninstall")
{cmd.exe /c $uninstallstring}

Readme.txt

Install Command
powershell.exe -executionpolicy bypass -file "NiniteInstall.ps1" -NiniteApp APPNAME -Invoke Install
Ex: powershell.exe -executionpolicy bypass -file "NiniteInstall.ps1" -NiniteApp 7zip -Invoke Install

Uninstall Command
powershell.exe -executionpolicy bypass -file "NiniteInstall.ps1" -NiniteApp APPNAME -Invoke Uninstall
Ex: powershell.exe -executionpolicy bypass -file "NiniteInstall.ps1" -NiniteApp 7zip -Invoke Uninstall

Detection Methods
7Zip: C:\Program Files\7-Zip\7z.exe
Chrome: C:\Program Files (x86)\Google\Chrome\Application\chrome.exe
FileZilla: C:\Program Files\FileZilla FTP Client\filezilla.exe
Firefox: C:\Program Files\Mozilla Firefox\firefox.exe
Greenshot: C:\Program Files\Greenshot\Greenshot.exe
VSCode: C:\Program Files\Microsoft VS Code\Code.exe
VLC: C:\Program Files\VideoLAN\VLC\vlc.exe
WinDirStat: C:\Program Files (x86)\WinDirStat\windirstat.exe


See it in Action

Video (Task Sequence)

Video (Software Center)

Watch the Script in Action:

Notes: PERSONAL LAB ONLY!
If you'd like to add other Ninite App options into the script, feel free.  I've found not all of them use the target.exe or msiexec.exe sub processes, so you'd have to account for that (Examples are .Net 4.7.1 and Paint.Net, for my lab, I pulled those out and made separate app scripts).

More info: Ninite.com Terms: "The free version of Ninite is only licensed for home use and as a trial for Ninite Pro. If you get paid for running Ninite (like in an IT department, PC shop, managed service provider, school, non-volunteer helpdesk, etc.) you must upgrade to Ninite Pro. "


BGinfo Updating MDT Default Templates

$
0
0

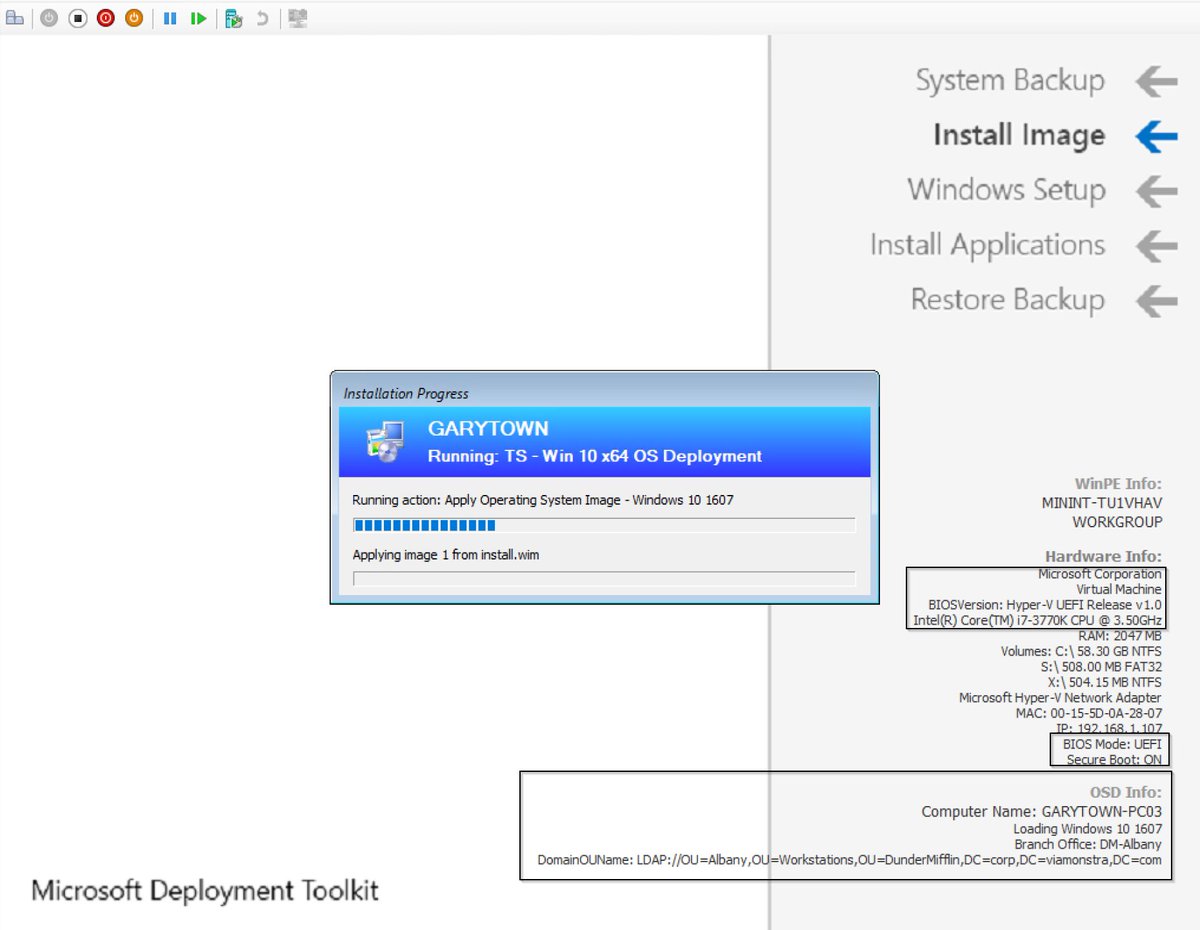
If you use MDT, then you’re familiar with their use of changing the background and adding system information during the OSD process.  This is pretty handy to get some basic info, but with a little tweaking, you can add additional data that can be very useful to make visible during OSD.

Basics, the required files used during this process are stored here: MDT Package\Tools\x64 & x86

image

It currently comes with old version of bginfo 4.20, the current version when writing this is 4.25.  I replace the ones that come bundled with the updated version. Download BGInfo

In the x86 folder is where the templates and images files are located.  This will also be the folder you add your custom .vbs files, but we’ll get to that later.
image

the .BGI files are the bginfo “database” files that contain the template information (layout, options, background choice).  The .BMP files are the images referenced in the .BGI files. The image files are 800x600, so they can look fuzzy on high-res screens. This image below is STEP_02.BMP (referenced by STEP_02.BGI) - Called during "Set Status 2" Step in a MDT enabled Task Sequence.
image

Bginfo then overlays additional information:
This image below is pretty close to the default, after adding 2 of the items Mike Terrill blogged about, and one additional Item based on a TS Variable.

Here is my current template after a few additional modifications, which I go into more detail below.

Following Mike’s blog, I added the BIOS Mode & Secure Boot Fields, as well as the Make & Model information (WQL Query), pulled directly from his post.  I then proceeded to add Processor Model & BIOS version, then several TS Variables.

Make sure you’ve downloaded the updated bginfo.exe files and place them into their corresponding MDT folders (x86 & x64).  Then on the x86 folder (even if on x64 machine), open bginfo.exe

At this point in the reading, you have hopefully stopped and read Mike’s blog, as I don’t want to completely plagiarize,  and this will be pretty similar.
image
(Sorry, the default fonts are hard to see against the default black background)

Once you launch the tool, go ahead and open STEP_02.BGI file in the x86 folder.

If you click on “Background” you’ll see the name of the background file that is associated with the template: Step_02.bmp, which is located in the same x86 folder, as shown in the earlier pictures.
image

At this point you can start to modify to get it how you like.  Mine now looks like this: (Keep reading, I’ll get to the Custom Fields)

image


I broke it into a few categories, WinPE info, which is the current OS when STEP_02 runs, so the commands are being run against the WinPE image.  This is why you get a MININT-XXXXXX computer name and no workgroup, as WinPE isn’t in your domain, and auto generates the computer name.

I then broke out hardware info about the physical machine into it’s own area, which includes additional built in options, and a few additional vbs scripts.

Finally, pulling in OSD information from the TS that is running.  To achieve this, in the TS, I write those items to the WinPE registry, so I can easily harvest it from bginfo.  Since it's written to the WinPE registry, it's only temporary, and you don't need to worry about cleaning it up later, it goes away after the reboot.
image

To add fields, click "Custom" right under the fields list.

image

Click New…

image

Choose the method to pull your info, in the example I’m using WMI Query to get the BIOS version.

Here are a few example WMI Queries: Note, WMIExplorer was really handy to dig around and find information that I wanted to display.

BIOS Version: 
SELECT SMBIOSBIOSVersion FROM Win32_bios

Manufacturer:
SELECT Manufacturer FROM Win32_ComputerSystem

Model:
SELECT Model FROM Win32_ComputerSystem

Processor Model:
SELECT Name FROM Win32_Processor


.VBS Files (must all be placed in the x86 folder, even if using x64, place them in the x86 folder)

NOTE, the .vbs files do not work if you try to run it from the command prompt, but they do work in bginfo.  If you want to test the scripts, replace echo with wscript.echo, then remove the wscript before using in bginfo.  Don't ask me, it's just the way it is.
image

Here are the .vbs scripts used.  I heard Mike will be updating the ones he posted, the ones below are the original.  They work fine in PE, and that was good enough for me, I don't need them to be fancy.  If you want to clean them up, be my guest, I basically found a template thanks to google and slightly modified to fit my needs.  Please don't judge me based on the beauty of the scripts I post.

BIOSMode (From Mike Terrill – UEFI or Legacy)

Const HKEY_LOCAL_MACHINE  = &H80000002
strComputer = "."
hDefKey = HKEY_LOCAL_MACHINE
strKeyPath = "SYSTEM\CurrentControlSet\Control\SecureBoot\State"
Set oReg = GetObject("winmgmts:{impersonationLevel=impersonate}!\\" & strComputer & "\root\default:StdRegProv")

If oReg.EnumKey(hDefKey, strKeyPath, arrSubKeys) = 0 Then
  echo "UEFI"
Else
  echo "BIOS"
End If

Drive (C: Drive Space)

Const HARD_DISK = 3

strComputer = "."

Set objWMIService = GetObject("winmgmts:" _
   & "{impersonationLevel=impersonate}!\\" & strComputer & "\root\cimv2")

Set colDisks = objWMIService.ExecQuery _
   ("Select * from Win32_LogicalDisk Where DeviceID = 'C:'")

For Each objDisk in colDisks 
   sizeGB = FormatNumber(objDisk.Size /(1024^3), 0 )
   Echo sizeGB
Next

SecureBoot (From Mike Terrill – Enabled or Not)

Const HKEY_LOCAL_MACHINE = &H80000002 
strComputer = "."  
hDefKey = HKEY_LOCAL_MACHINE
Set oReg = GetObject("winmgmts:{impersonationLevel=impersonate}!\\" & strComputer & "\root\default:StdRegProv") 
strKeyPath = "SYSTEM\CurrentControlSet\Control\SecureBoot\State" 
strValueName = "UEFISecureBootEnabled" 
oReg.GetDWORDValue hDefKey,strKeyPath,strValueName,dwValue 

If dwValue = 0 Then 
	Echo "OFF"
ElseIf dwValue = 1 Then 
	Echo "ON"
Else
	Echo "NA"
End If

VolumeFree (C: Drive – Free Space)

Const HARD_DISK = 3

strComputer = "."

Set objWMIService = GetObject("winmgmts:" _
   & "{impersonationLevel=impersonate}!\\" & strComputer & "\root\cimv2")

Set colDisks = objWMIService.ExecQuery _
   ("Select * from Win32_LogicalDisk Where DeviceID = 'C:'")

For Each objDisk in colDisks 
   sizeGB = FormatNumber(objDisk.FreeSpace /(1024^3), 0 )
   Echo sizeGB
Next


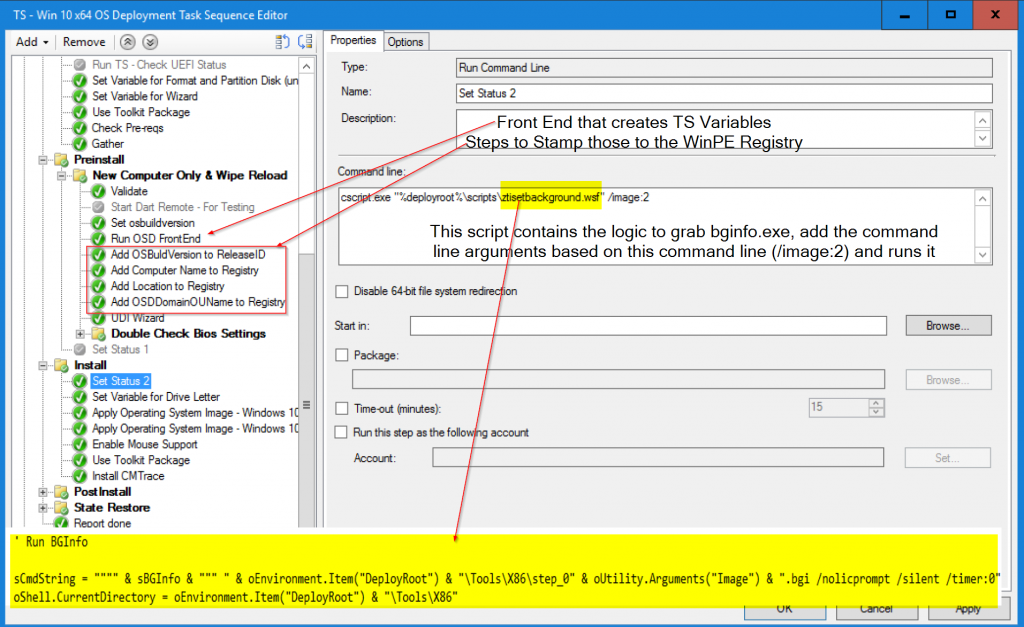
Registry, these were keys I created during the TS by stamping TS Variables to Key Values.
image

These are stamped to the WinPE registry, as that is the OS running when this is displaying.  In my TS, I don’t have any additional BGinfo / Images display once it’s out of PE, after that’s it’s finishing the OSD with the windows setup black screen, so I only needed this info to display during the WinPE stage, which made writing it to the registry the perfect solution for my purposes.

OSD Computer Name - What you're naming the PC you're Imaging:
REG ADD "HKLM\SOFTWARE\GARYTOWN" /V ComputerName /T REG_SZ /D "%OSDComputerName%" /F

OSDDomainOUName - OU It's Being Image into:
REG ADD "HKLM\SOFTWARE\GARYTOWN" /V OSDDomainOUName /T REG_SZ /D %OSDDomainOUName% /F

OSBuildVersion - Custom Variable that is the Build of Windows I'm deploying:
REG ADD "HKLM\SOFTWARE\Microsoft\Windows NT\CurrentVersion" /V ReleaseID /T REG_SZ /D %osbuildversion% /F

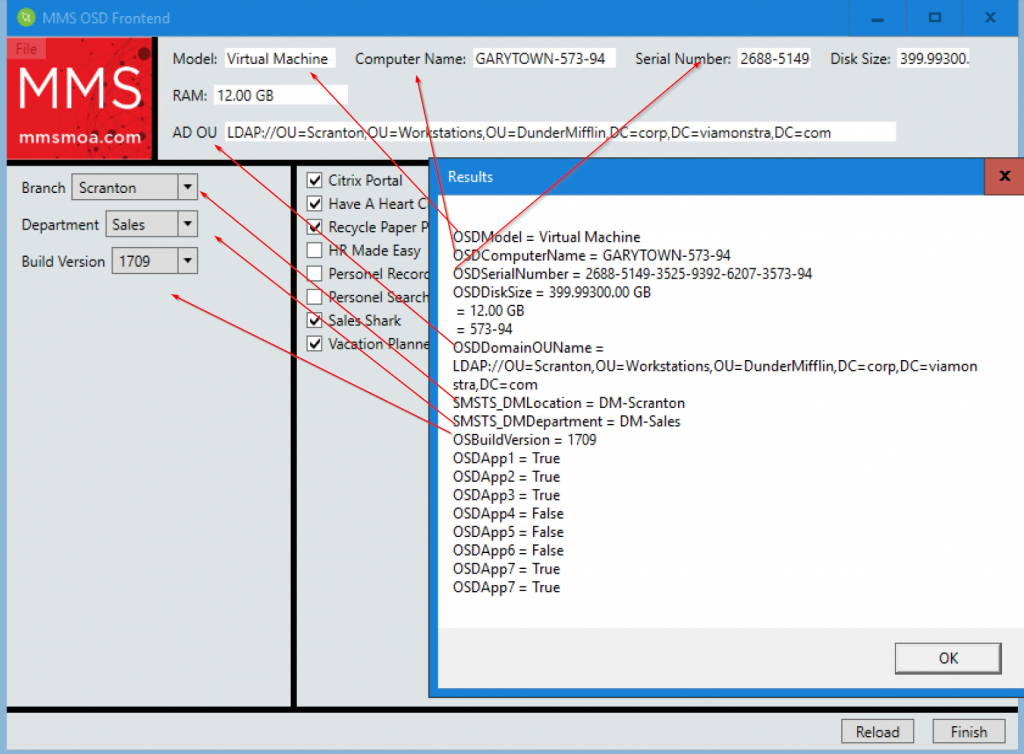
The Variables are set using a FrontEnd or Collection Variables.  I use the Now Micro front end in my lab. Link HERE, scroll down to the FrontEnd Link.  The AD OU is a direct relation to the "Branch" Chosen and auto populated. In this front end, everything in the top area is auto generated based on Queries, or other imput, the only field that can be modifed is teh Computer Name, either leave the auto generated one, or modify for the deployment.  If doing a "Refresh" all of the variables are set on my collections, %OSDComputerName% is the name the computer already has,  so the settings (variables) would be reapplied automatically during a Reimage with no need for the front end.  This is just an example, basically you can put anything you want into BGInfo, just need to be a little creative.

Note, if you're creating variables and registry keys to use in BGInfo, I know this seems obvious, but make sure you run the steps to create the variables and keys before you run the step for BGInfo! (Set Status 2 - Which is a native MDT Step auto generated) The Step is calling the ztibackground.wsf file, which gathers information (architecture, etc) uses that to call the correct version of bginfo (x86 or x64) then pull the additional files (templates, Images, scripts) from the x86 folder, even on x64 machines.

Once you’ve added all of your Custom Fields, you can then add them into your bginfo template, and play around with that, it’s basically like working with wordpad from windows 95.

Once you have your desired layout, save the template and overwrite the default.  Then update the MDT Package in ConfigMgr.

Here is my Template File & VBS files, over write the ones in the x86 folder.

Coming up next, taking this and applying it to in-place upgrade.

Please comment with additional .vbs scripts or things you've found handy to add.  Feedback is always welcome.

BGIn-Place Upgrades

$
0
0

image

image
If (You Enjoy Reading)

{
I thought that was a clever title, but it seems more confusing the longer I look at it… anyway, this is the follow up post to take BGinfo from MDT, and add it’s capabilities to the ConfigMgr In-Place Upgrade Task Sequence Process.  If you’ve been working with in-place upgrade task sequences, you’ll know they are a different beast than regular OSD.  You can’t just call an application and expect it to show up on the screen.. like in OSD, you can say Command Line Step: notepad.exe… and guess what, a notepad.exe window opens during the TS.. freaking amazing!

In Place Upgrades also have new challenges we didn’t really have before with OSD.  OSD (bare metal) typically meant it was a clean image, we didn’t have end users sitting in front of it while installing the OS, didn’t have user profiles already full of “super precious data”, we really didn’t need to worry about the end user experience.  Now here comes Windows 10, Love it or love it, it’s here to stay, Windows as a Service, it means once OSD is done, that was the easy part, now we have to “touch” that computer every 6 months with a large upgrade.  Now we do have users to worry about, we have their precious little datas, and we have to deal with users who don’t read emails, and don’t read popups, and don’t read “ARE YOU SURE” dialog boxes, who just click “Sure” when something pops up, then freak out when it reboots 15 minutes later after they “consented” to an update.  And because they were working on large sales strategy document they only save on their desktop (Where else would you save business critical documents), and because the moon was full and the person sneezed in the cube adjacent, their document is now gone, or corrupted, or missing 4 days of edits!   Anyway, my point, we have the privilege of attempting to provide a decent user experience and making the process the most user friendly while still applying a huge upgrade that is ripping out the guts of the OS and dropping in the newer OS, with features they didn’t really request, and unknown stability with their current business apps.  But I digress…

Where was I going with that… oh yeah, ways to let the user know that hey “A BIG UPGRADE IS HAPPENING… SAVE YOUR STUFF”.  I’ve done this in the past with changing the Lock Screen, creating a method to prevent a user from logging on, but what if the user is logged in, they started the TS, but still just don’t get it… how about we temporarily change the background and put up a message that displays for that logged on user until the moment that beautiful first reboot happens?  I say, why not… lets do it.  My idea, steal MDT’s Bginfo “Set Status” Step, and add it to the In Place upgrade TS.  I copied  over the “Use MDT Tool Kit” Step, and “Set Status 2” Step, but when it ran that step in the TS… ERROR city.  Figured it was too easy. So this is what I had to do.

}

Else
{

Assuming you followed the last blog, you’re most of the way there. (I’ve provided all of the files in the zip download, so you can steal those or create your own)

Your folder structure will look like this basically:
image

  • BGInfo64.exe – Download Here
  • vbs scripts – to be used for the custom fields
  • ServiceUI.exe – Take from MDTPackage\Tools\x64
  • BGI file(s) – Create new, or steal from MDT – Included in my download
  • Image file (.bmp) – Create new, or steal from MDT – Included in my download

Open your BGI File with BGInfo64 and add your fields and text (or modify the one I’ve provided)
imageNote, this will be different than the one we used for OSD, as this time, it is running in the OS, and not WinPE.
Set your Background, note, do not use the full path, just the name of the file, as all of the required files are located in the same directory.
image

Ok, the BGInfo part is done, feel free to press Preview and confirm it looks how you want, when you’re satisfied, save everything, and create your ConfigMgr package and distribute
image
Now that you have your package ready, its time to add it to the TS
image
Run Command Line Step

Basically, we’re stealing the logic from the ztiSetBackground.wsf file in MDT Scripts, and manually creating the command line:
"bginfo64.exe WinUpgradeGaryTown.BGI /nolicprompt /silent /timer:0"
But you’d quick learn, that doesn’t work… you need to use ServiceUI.exe to make it visible, which once you figure out that syntax, you get this:

ServiceUI.exe -process:tsprogressui.exe "%WINDIR%\System32\cmd.exe" /c "bginfo64.exe WinUpgradeGaryTown.BGI /nolicprompt /silent /timer:0"

Now add a condition that it only runs if it was user imitated.  no point in changing the background is no one is there to see it. 🙂
Also have seen this step failed if a user is NOT logged on.  So recommend you set to "Continue on Error" if you plan to have it run without checking to see if  a user is logged on, and run it without a user logged on.

TS Variable = _SMSTSUserStarted = True


Now, sit back and watch your TS give the user something they can’t avoid… unless their desktop is completely covered with files / icons…

}

ConfigMgr Client Provisioning Mode

$
0
0

I’ve been doing a lot of testing with Provisioning Mode.  I needed to know what was going on when a system was in provisioning mode.  I’m expecting official docs to be released soon, I’ll link to them once it’s posted.

Basics: (Enter Provisioning Mode & Exit Commands) - More info HERE @ scconfigmgr.com

Enter Provisioning Mode:
Invoke-WmiMethod -Namespace "root\ccm" -Class "SMS_Client" -Name "SetClientProvisioningMode" $true

Exit Provisioning Mode:
Invoke-WmiMethod -Namespace "root\ccm" -Class "SMS_Client" -Name "SetClientProvisioningMode" $false

To Check Status: HKLM\SOFTWARE\Microsoft\CCM\CcmExec
Provisioning Mode: False (Not in Provisioning Mode)

Provisioning Mode: True (In Provisioning Mode)

In the CcmExec.log, once you tell the machine go into provisioning mode, you'll see it shutting down CCMEXEC and move into Provisioning Mode State, but it never actually says it's entering into provisioning mode.

Learned from Testing (while in Provisioning Mode)

  1. Client will not pull down any new CM Policies
    1. Provisioning mode has NO connection to Group Policy.  Group Policies still process while in Provisioning mode
  2. When a deployment reaches it’s deadline, it will change status to “Past Due” but does not start the installs.
    1. Tested with both Application Deployments & Software Updates.  Neither started installing when reached their deadlines, only Status changed from “Scheduled for XX Time” to “Past Due”
  3. When client is removed from Provisioning mode, machine policy is updated nearly immediately, and past due installations start ASAP.

When is the client set to Provisioning mode (When is it supposed to be)?   If it is in provisioning mode outside of these scenarios, it's probably an issue and you'll want to look into it

  1. During OSD, once the Client is installed, it is set to provisioning mode and stay in provisioning mode until the end of the TS. For context of how close to the end it is, it’s set after all of the steps in the TS, but right before the SMSTSPostAction
    image
  2. In Place Upgrade
    1. Once the TS reaches “Upgrade Operating System” Step, it enters provisioning mode, and stops ccmexec service (Software Center closes if you still had that open) – It enters Provisioning Mode before the TS even downloads the Upgrade Media. unless you tell the TS to download all content before starting, this is a good reason to precache!
      image
    2. After the upgrade process is complete, even if it fails like in my test, it will take the client back out of provisioning mode and restart the services.
      image
  3. In Place Upgrade (Compat-Scan Only Mode)
    1. Identical process to Upgrade, even though it doesn’t actually upgrade.  This has been raised as a bug / uservoice item, and in a future release, the upgrade process, if running compat / scan only mode, it will not put the system into provisioning mode.

      Uservoice: https://configurationmanager.uservoice.com/forums/300492-ideas/suggestions/33036856-don-t-set-ccmclient-to-provisioning-mode-if-runnin

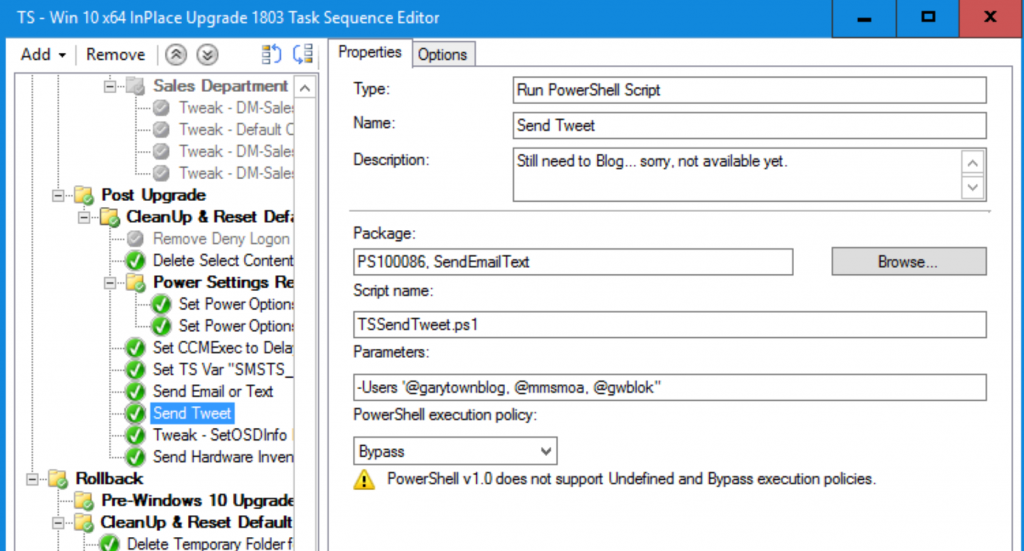
Issues I've run into with Provisioning Mode.  During CompatScan Only mode TS running, I've had users reboot the machine, leaving the machine in provisioning mode when it came back up.  While the window for this happening is small, 5 - 20 minutes, it has happened.  We have the CompatScan Only TS running in the background unknown to the users, so it's not really their fault if they reboot it during the process.  To work around this, I create a run once command to take a machine out of provisioning mode, if the process completes successfully, I delete the run once key as all is well, however, if the user does happen to reboot during the process, the next logon on, it will remove itself from provisioning mode thanks the turn run once key. (as shown in the twitter image of the TS Steps above)

TESTS RUN:

Collection with Required Deployments: 2 apps & software updates.  Deadline for 6:30PM Client Time.

Machine is already in Provisioning Mode when Deployments are Created.  Results:  The Required Deployments never show up in the Software Center.

Deployments Created on Machine NOT in provisioning Mode, they show up in software Center with Deadline time. Then after the machine has the updated Policy, I placed it into Provisioning Mode.  Sorry, this machine is already patched, so it doesn't show any of the MS Updates, but I have confirmed on other tests that Software Updates also respect Provisioning Mode and do NOT install.

After the Deadline, "Nothing" happens.  Status changes from Scheduled... to Past Due, but the installs do NOT start.
So 2.5 hours past deadline, still no change.

Then I run command to take machine out of provisioning mode (which closes the software center).  I then reopen Software Center and see those two Apps are already installing.


So, provisioning mode, hopefully this helps demystify what it is, and the effects it has on the ConfigMgr client.


Send Text and Email to User from Task Sequence

$
0
0

Bonus: Learn to use Gmails SMTP service.

Updated 3/6 - added auto close feature, so if user ignores the window, it will auto close allowing the TS to continue. (Updated the 3rd Form image below to reflect the change)

Or if some of you awesome PowerShell guys want to make my code pretty and add that feature...  🙂

As I try to improve the user experience for in-place upgrades, notifications came to mind, and how to incorporate that into the process.  Using the TS variable _SMSTSUserStarted = true, I launch a powershell driven “front end” to collect the user’s email, cell number & provider, then use that to notify user when process is complete.


Using @FoxDeploy’s guide and a little help over twitter, I was able to create a form to collection the information.

The form launches, to ask for the email, then check a box, if you check the box, it un-hides the rest of the form required for the text, and also “greys-out” the “OK” button, until the required information is collected.


Once the user inserts their Cell Number & selects a
radio button, the Ok button lights back up, and they can choose OK.  The Skip button just closes the form allowing the TS to continue with no data collected.

Once you click OK, the Data goes into the registry & into TS Variables.  I add it to the registry because I want it there for the next upgrade.  When the form loads, it will look for those keys, if they are there, it will auto populate, allowing the user to then click OK, or modify first, and then continue.

Code for Form:

# Most of this is borrowed straight from FoxDeploy.com
# https://foxdeploy.com/2015/04/10/part-i-creating-powershell-guis-in-minutes-using-visual-studio-a-new-hope/
# And I what I couldn't figure out, he typically helped me! @FoxDeploy, this wouldn't have been possible without him.

$TSProgressUI = new-object -comobject Microsoft.SMS.TSProgressUI
$TSProgressUI.CloseProgressDialog()


#Grab Registry Values if they are there, we can use this to prepopulate the Form from the previous upgrade.
$UserCell = (Get-ItemProperty "HKLM:\SOFTWARE\GaryTown\UserInfo").UserCell
$UserCellProvider = (Get-ItemProperty "HKLM:\SOFTWARE\GaryTown\UserInfo").UserCellProvider
$UserEmail = (Get-ItemProperty "HKLM:\SOFTWARE\GaryTown\UserInfo").UserEmail


#Place to write information to Registery - For future deployments, can grab and ask user if this is correct... still need to develop that idea.. just laying the groundwork for the future
#This also works well if you want to run this outside of the TS, then you can have the TS grab those keys to use.
#User's Email Address
#User's Cell Number
#User's Carrier (Required to send the text)
$registryPath = "HKLM:\Software\GaryTown\UserInfo"

#Check if running in TS
try
{
    $tsenv = New-Object -COMObject Microsoft.SMS.TSEnvironment
    #$tsenv.CloseProgressDialog()
}
catch
{
	Write-Verbose "Not running in a task sequence."
}


#ERASE ALL THIS AND PUT XAML BELOW between the @" "@ - XAML Code Generated from Vistual Studio Community Ed.
$inputXML = @"
<Window x:Class="WpfApp1.MainWindow"
        xmlns="http://schemas.microsoft.com/winfx/2006/xaml/presentation"
        xmlns:x="http://schemas.microsoft.com/winfx/2006/xaml"
        xmlns:d="http://schemas.microsoft.com/expression/blend/2008"
        xmlns:mc="http://schemas.openxmlformats.org/markup-compatibility/2006"
        xmlns:local="clr-namespace:WpfApp1"
        mc:Ignorable="d"
        Title="Optional User Notifications" Height="350" Width="525">
    <Grid x:Name="UserDialog" Margin="0,0,0,-0.5">
        <Grid.Background>
            <LinearGradientBrush EndPoint="0.5,1" StartPoint="0.5,0">
                <GradientStop Color="Black" Offset="1"/>
                <GradientStop Color="White"/>
            </LinearGradientBrush>
        </Grid.Background>
        <Grid.ColumnDefinitions>
            <ColumnDefinition Width="27*"/>
            <ColumnDefinition Width="103*"/>
        </Grid.ColumnDefinitions>
        <Label x:Name="LabelInfo" Content="If you would like to receive an email or test message when the &#xD;&#xA;upgrade is complete, please fill in the form and click OK." HorizontalAlignment="Left" Height="52" Margin="23,10,0,0" VerticalAlignment="Top" Width="487" Grid.ColumnSpan="2" FontSize="16"/>
        <TextBox x:Name="TBEmail" HorizontalAlignment="Left" Height="28" TextWrapping="Wrap" VerticalAlignment="Top" Width="233" Margin="105,63,0,0" Grid.ColumnSpan="2"/>
        <Label x:Name="LabelEmail1" Content="Email:" HorizontalAlignment="Left" VerticalAlignment="Top" Margin="23,64,0,0" Width="77" FontWeight="Bold" Height="28"/>
        <TextBox x:Name="TBCell" HorizontalAlignment="Left" Height="26" TextWrapping="Wrap" VerticalAlignment="Top" Width="120" Margin="209,119,0,0" Grid.Column="1" Visibility="Hidden"/>
        <Label x:Name="LabelCell" Content="Cell:  (1112223333, no spaces or other characters) " HorizontalAlignment="Left" VerticalAlignment="Top" Margin="23,118,0,0" Grid.ColumnSpan="2" FontWeight="Bold" Visibility="Hidden"/>
        <RadioButton x:Name="RBAlltel" Content="AllTel" HorizontalAlignment="Left" Margin="113.552,161,0,0" VerticalAlignment="Top" Grid.Column="1" FontWeight="Bold" Foreground="#FFD5D5D5" Visibility="Hidden"/>
        <RadioButton x:Name="RBATT" Content="AT&amp;T" HorizontalAlignment="Left" Margin="113.552,181,0,0" VerticalAlignment="Top" Grid.Column="1" FontWeight="Bold" Foreground="#FFD5D5D5" Visibility="Hidden" />
        <RadioButton x:Name="RBVirgin" Content="Virgin Mobile" HorizontalAlignment="Left" Margin="205,161,0,0" VerticalAlignment="Top" Grid.Column="1" FontWeight="Bold" Foreground="#FFD5D5D5" Visibility="Hidden"/>
        <RadioButton x:Name="RBTMobile" Content="T-Mobile" HorizontalAlignment="Left" Margin="114,201,0,0" VerticalAlignment="Top" Grid.Column="1" FontWeight="Bold" Foreground="#FFD5D5D5" Visibility="Hidden" />
        <RadioButton x:Name="RBVerizon" Content="Verizon" HorizontalAlignment="Left" Margin="114,220,0,0" VerticalAlignment="Top" Grid.Column="1" FontWeight="Bold" Foreground="#FFD5D5D5" Visibility="Hidden" />
        <RadioButton x:Name="RBRepublic" Content="Republic Wireless" HorizontalAlignment="Left" Margin="205,181,0,0" VerticalAlignment="Top" Grid.Column="1" FontWeight="Bold" Foreground="#FFD5D5D5" Visibility="Hidden"/>
        <RadioButton x:Name="RBUSCellular" Content="U.S. Cellular" HorizontalAlignment="Left" Margin="205,202,0,0" VerticalAlignment="Top" Grid.Column="1" FontWeight="Bold" Foreground="#FFD5D5D5" Visibility="Hidden"/>
        <RadioButton x:Name="RBSprint" Content="Sprint &amp; Boost Mobile" HorizontalAlignment="Left" Margin="205,220,0,0" VerticalAlignment="Top" Grid.Column="1" FontWeight="Bold" Foreground="#FFD5D5D5"  Visibility="Hidden"/>
        <Label x:Name="LabelCarrier" Content="Please select your Cell Carrier:" HorizontalAlignment="Left" Height="35" Margin="23,155,0,0" VerticalAlignment="Top" Width="184" Grid.ColumnSpan="2" FontWeight="Bold" Foreground="#FFD5D5D5" Visibility="Hidden"/>
        <Button x:Name="ButtonOK" Content="OK" HorizontalAlignment="Left" VerticalAlignment="Top" Width="75" Margin="195.552,281,0,0" Grid.Column="1"/>
        <Button x:Name="ButtonSkip" Content="Skip" HorizontalAlignment="Left" VerticalAlignment="Top" Width="75" Margin="302.552,281,0,0" Grid.Column="1"/>
        <CheckBox x:Name="CBSMS" Content="Check if you would like  to receive a text message" HorizontalAlignment="Left" Margin="28,93,0,0" VerticalAlignment="Top" Grid.ColumnSpan="2" Width="310"/>
        <Label x:Name="LabelCellError" Content="Please confirm your Cell &#xD;&#xA;number, it should only be &#xD;&#xA;10 numbers long" Grid.Column="1" HorizontalAlignment="Left" Margin="235,60,0,0" VerticalAlignment="Top" Height="81" Width="171" Visibility="Hidden"/>
        <Label x:Name="LabelGTown" Grid.ColumnSpan="2" Content="GARYTOWN.COM" HorizontalAlignment="Left" Height="41" Margin="29,271,0,0" VerticalAlignment="Top" Width="207" FontWeight="Bold" FontSize="20" Foreground="#FF6B5C5C"/>
        <TextBox x:Name="TBTimeBox" HorizontalAlignment="Left" Height="23" Margin="20,248,0,0" TextWrapping="Wrap" Text="TextBox" VerticalAlignment="Top" Width="60" Grid.Column="1"/>
        <Label x:Name="LabelAutoClose" Content="Auto Close in:" VerticalAlignment="Top" Margin="37,245,354,0" FontWeight="Bold" Height="28" Grid.ColumnSpan="2" Foreground="#FF6B5C5C"/>


    </Grid>
</Window>
"@       
 
$inputXML = $inputXML -replace 'mc:Ignorable="d"','' -replace "x:N",'N'  -replace '^<Win.*', '<Window'
 
[void][System.Reflection.Assembly]::LoadWithPartialName('presentationframework')
[xml]$XAML = $inputXML
#Read XAML
 
    $reader=(New-Object System.Xml.XmlNodeReader $xaml)
try{$Form=[Windows.Markup.XamlReader]::Load( $reader )}
catch{Write-Warning "Unable to parse XML, with error: $($Error[0])`n Ensure that there are NO SelectionChanged properties (PowerShell cannot process them)"
    throw}
 
#===========================================================================
# Load XAML Objects In PowerShell
#===========================================================================
  
$xaml.SelectNodes("//*[@Name]") | %{"trying item $($_.Name)";
    try {Set-Variable -Name "WPF$($_.Name)" -Value $Form.FindName($_.Name) -ErrorAction Stop}
    catch{throw}
    }
Function Get-FormVariables{
if ($global:ReadmeDisplay -ne $true){Write-host "If you need to reference this display again, run Get-FormVariables" -ForegroundColor Yellow;$global:ReadmeDisplay=$true}
write-host "Found the following interactable elements from our form" -ForegroundColor Cyan
get-variable WPF*
}
 
Get-FormVariables

#AutoFills Text Box & Radio Buttons if they were filled out before.
$WPFTBCell.Text = $UserCell
$WPFTBEmail.Text = $UserEmail

if ($UserCellProvider -eq 'alltel'){$WPFRBAlltel.IsChecked = $true}`
elseif ($UserCellProvider-eq 'ATT'){$WPFRBATT.IsChecked = $true}`
elseif ($UserCellProvider -eq 'Sprint'){$WPFRBSprint.IsChecked = $true}`
elseif ($UserCellProvider -eq 'TMobile'){$WPFRBTMobile.IsChecked = $true}`
elseif ($UserCellProvider -eq 'Verizon'){$WPFRBVerizon.IsChecked = $true}`
elseif ($UserCellProvider -eq 'Virgin'){$WPFRBVirgin.IsChecked = $true}`
elseif ($UserCellProvider -eq 'Republic'){$WPFRBRepublic.IsChecked = $true}`
elseif ($UserCellProvider -eq 'Cellular'){$WPFRBUSCellular.IsChecked = $true}

#===========================================================================
# Actually make the objects work
#===========================================================================


#gather all of the settings the user specifies, needed to splat to the New-ADUser Cmd later
function Get-FormFields {

   $CellProvider = if ($WPFRBAlltel.IsChecked -eq $true){'alltel'}`
                elseif ($WPFRBATT.IsChecked -eq $true){'ATT'}`
                elseif ($WPFRBSprint.IsChecked -eq $true){'Sprint'}`
                elseif ($WPFRBTMobile.IsChecked -eq $true){'TMobile'}`
                elseif ($WPFRBVirgin.IsChecked -eq $true){'Virgin'}`
                elseif ($WPFRBRepublic.IsChecked -eq $true){'Republic'}`
                elseif ($WPFRBUSCellular.IsChecked -eq $true){'Cellular'}`
                elseif ($WPFRBVerizon.IsChecked -eq $true){'Verizon'}
    return $CellProvider
     
          
          }

$WPFTBCell.Add_TextChanged({
    If (($WPFTBCell.Text.Length -ge 11)){
      $WPFLabelCellError.Visibility = 'Visible'
    }else
    {
    $WPFLabelCellError.Visibility = 'Hidden'
    }
}) 

#When you Check the Box to receive SMS text, it unhides several boxes and DISABLES the OK button (until a radio option is clicked)
$WPFCBSMS.Add_Checked({
    $WPFTBCell.Visibility = 'Visible'
    $WPFLabelCell.Visibility = 'Visible'
    $WPFRBAlltel.Visibility = 'Visible'
    $WPFRBATT.Visibility = 'Visible'
    $WPFRBSprint.Visibility = 'Visible'
    $WPFRBTMobile.Visibility = 'Visible'
    $WPFRBVirgin.Visibility = 'Visible'
    $WPFRBVerizon.Visibility = 'Visible'
    $WPFRBRepublic.Visibility = 'Visible'
    $WPFRBUSCellular.Visibility = 'Visible'
    $WPFLabelCarrier.Visibility = 'Visible'
    if ($UserCellProvider -ne $null){$WPFbuttonOK.IsEnabled = $true}
    else {$WPFbuttonOK.IsEnabled = $false}

    })
#This will hide the items again if you uncheck the box
$WPFCBSMS.Add_UnChecked({
    $WPFTBCell.Visibility = 'Hidden'
    $WPFLabelCell.Visibility = 'Hidden'
    $WPFRBAlltel.Visibility = 'Hidden'
    $WPFRBATT.Visibility = 'Hidden'
    $WPFRBSprint.Visibility = 'Hidden'
    $WPFRBTMobile.Visibility = 'Hidden'
    $WPFRBVerizon.Visibility = 'Hidden'
    $WPFRBVirgin.Visibility = 'Hidden'
    $WPFRBRepublic.Visibility = 'Hidden'
    $WPFRBUSCellular.Visibility = 'Hidden'
    $WPFLabelCarrier.Visibility = 'Hidden'
    })

#This enables the OK button if a radio button is choosen (Select a Carrier)
$WPFRBAlltel.Add_Click({$WPFbuttonOK.IsEnabled = $true })
$WPFRBATT.Add_Click({$WPFbuttonOK.IsEnabled = $true })
$WPFRBSprint.Add_Click({$WPFbuttonOK.IsEnabled = $true })
$WPFRBTMobile.Add_Click({$WPFbuttonOK.IsEnabled = $true })
$WPFRBVerizon.Add_Click({$WPFbuttonOK.IsEnabled = $true })
$WPFRBVirgin.Add_Click({$WPFbuttonOK.IsEnabled = $true })
$WPFRBRepublic.Add_Click({$WPFbuttonOK.IsEnabled = $true })
$WPFRBUSCellular.Add_Click({$WPFbuttonOK.IsEnabled = $true })


$WPFbuttonOK.Add_Click({
$CellProvider = Get-FormFields

if ($tsenv)
{
$tsenv.Value('TSUserEmail') = $WPFTBEmail.Text
$tsenv.Value('TSUserCell') = $WPFTBCell.Text
$tsenv.Value('TSUserCellProvider') = $CellProvider
}

if ( -not ( test-path $registryPath ) ) {new-item -ItemType directory -path $registryPath -force -erroraction SilentlyContinue | out-null}
New-ItemProperty -Path $registryPath -Name "UserEmail" -PropertyType String -Value $WPFTBEmail.Text -Force
New-ItemProperty -Path $registryPath -Name "UserCell" -PropertyType String -Value $WPFTBCell.Text -Force
New-ItemProperty -Path $registryPath -Name "UserCellProvider" -PropertyType String -Value $CellProvider -Force


start-sleep -Milliseconds 840

$form.Close()
})

$WPFButtonSkip.Add_Click({
start-sleep -Milliseconds 840
$form.Close()
})

#Timer code borrowed from: https://social.microsoft.com/Forums/en-US/e2dfa35f-607e-4749-8ac7-776001b2cbe8/powershell-countdown-timer-wpf-appearance-and-trouble-updating-text?forum=Offtopic
#Event handlers            
$form.Add_SourceInitialized({
    # Before the window's even displayed ...           
    # We'll create a timer           
    $script:seconds =([timespan]0).Add('0:5')  # 5 minutes
    $script:timer = new-object System.Windows.Threading.DispatcherTimer
    # Which fire 1 time each second
    $timer.Interval = [TimeSpan]'0:0:1.0'
    # And will invoke the $updateBlock         
    $timer.Add_Tick.Invoke($UpDateBlock)
    # Now start the timer running           
    $timer.Start()
    if ($timer.IsEnabled -eq $false) {
        write-warning "Timer didn't start"
    }
})

$UpDateBlock = ({
    $script:seconds= $script:seconds.Subtract('0:0:1')
    $WPFTBTimeBox.Text=$seconds.ToString('mm\:ss')
    if($seconds -eq 0) {  $form.Close()  }
}) 
#Sample entry of how to add data to a field
 
#$vmpicklistView.items.Add([pscustomobject]@{'VMName'=($_).Name;Status=$_.Status;Other="Yes"})
 
#===========================================================================
# Shows the form
#===========================================================================
write-host "To show the form, run the following" -ForegroundColor Cyan
$Form.ShowDialog() | out-null


TS Step for Form:
image

Code from Command Line: *NOTE, requires ServiceUI.exe in the same package as the scripts:

ServiceUI.exe -process:TSProgressUI.exe %SYSTEMROOT%\System32\WindowsPowerShell\v1.0\powershell.exe -NoProfile -WindowStyle Hidden -ExecutionPolicy Bypass -File XAML.ps1

image

At the end of the TS, there is a last step that runs another script that will grab the variables and send the email and text.  Currently I’m using Gmail’s SMTP service to do it, I created a new gmail account and set the required changes needed to use it to relay SMTP email. Instructions HERE - Follow the instructions for use Gmail SMTP Server, which requires you to first set "Less Secure Apps" is enabled for the account. The username & password are in clear text in my script, feel free to modify it to use a more secure method, like a password file, or use an internal SMTP server that doesn’t require authentication.

Why the radio buttons for the carrier?  Most carriers have a way to send text using an email address.  I use this feature to append the email address suffix onto the cell number and send the email to that cell phone’s SMS email address, so it comes in as a text.  If your carrier isn’t listed, you can probably look it up on their website.  Example, I use Boost Mobile, which is on the Sprint Network, in my testing, using my cell number and the Sprint’s email, it would send me the text.  You can probably just google it too..
image

Code for Script:

#Script cobbled together by @gwblok - garytown.com
#Gmail Send Mail Script orginally borrowed from: http://petermorrissey.blogspot.ro/2013/01/sending-smtp-emails-with-powershell.html
#To use this to send a text message was of my own design.

#Settings for Google
$SMTPServer = "smtp.gmail.com"
$SMTPPort = "587"
$Username = "username@gmail.com"
$Password = "GmailPassword"

#Connect to Task Sequence Environment
$tsenv = New-Object -COMObject Microsoft.SMS.TSEnvironment

$UserEmail = $tsenv.Value("TSUserEmail")
$UserCell = $tsenv.Value("TSUserCell")
$UserCellProvider = $tsenv.Value("TSUserCellProvider")

if ($UserCellProvider -eq 'AllTel'){$UserCellProvider = "@message.alltel.com"}
elseif ($UserCellProvider -eq 'ATT'){$UserCellProvider = "@text.att.net"}
elseif ($UserCellProvider -eq 'Sprint'){$UserCellProvider = "@messaging.sprintpcs.com"}
elseif ($UserCellProvider -eq 'TMobile'){$UserCellProvider = "@tmomail.net"}
elseif ($UserCellProvider -eq 'Verizon'){$UserCellProvider = "@vtext.com"}
elseif ($UserCellProvider -eq 'Virgin'){$UserCellProvider = "@vmobl.com"}
elseif ($UserCellProvider -eq 'Republic'){$UserCellProvider = "@text.republicwireless.com"}
elseif ($UserCellProvider -eq 'Cellular'){$UserCellProvider = "@email.uscc.net"}


#Email & Phone Numbers go Here
$to = $UserEmail
$cc = "$UserCell$UserCellProvider"

#Customize this Part for your Subject & Body.  Keep it short if you plan to use SMS texts.
$subject = "TS Notification: Upgrade Complete"
$body = "Your Upgrade on $env:computername Has Been Completed, you can now log back into the PC"

$message = New-Object System.Net.Mail.MailMessage
$message.subject = $subject
$message.body = $body
$message.to.add($to)
$message.cc.add($cc)
$message.from = $username

$smtp = New-Object System.Net.Mail.SmtpClient($SMTPServer, $SMTPPort);
$smtp.EnableSSL = $true
$smtp.Credentials = New-Object System.Net.NetworkCredential($Username, $Password);
$smtp.send($message)
write-host "Mail Sent"


Step in TS:
image

Feel free to skip the user interaction part, and just hardcode the script to send a text or email to a specific person for every upgrade / OSD deployment, like your boss, so you can prove how often you upgrade a machine successfully, I’m sure the sentiment will be of Awe, and not annoyance.


As always, please leave a comment or hit me up on twitter.  I only tested sending text messages to Boost Mobile & Verizon, but I ASSUME rest of them will work.  If you find any problem, please leave a comment to help others.


PS.. please forgive my powershell code, I’m still learning, and most of it is thanks to googling and trial and error.

Get Package CCMCache Location

$
0
0

Ever want to know where in the CCMCache the content was located for that package that was downloaded?  Ever think you found it, then figured out it wasn't the most updated version of the content?  I quick wrote this script to help me find where in the cache the content is located, and spits back the most updated version of it.


[CmdletBinding()]
Param(
[Parameter(Mandatory=$true,Position=1,HelpMessage="Package ID")]
[ValidateNotNullOrEmpty()]
[string]$PackageID
)

$CMObject = New-Object -ComObject 'UIResource.UIResourceMgr'
$CMCacheObjects = $CMObject.GetCacheInfo()
$OSUpgradeContent = $CMCacheObjects.GetCacheElements() | Where-Object {$_.ContentID -eq "$PackageID"}
$ContentVersion = $OSUpgradeContent.ContentVersion
$HighestContentID = $ContentVersion | measure -Maximum
$NewestContent = $OSUpgradeContent | Where-Object {$_.ContentVersion -eq $HighestContentID.Maximum}
$NewestContent.Location

Note, this was mostly for troubleshooting app installs, but I also found I could take advantage of this in a TS to locate content for a run commadline step.

Collect OSD / IPU Info with Hardware Inventory

$
0
0

Several years ago I started to use Jason Sandys’ OSDInfo Script.  I liked the idea of having a script run during OSD that would write information to WMI, which made it easy to inventory.  Now I do IPU (In Place Upgrade) so much more than OSD, and I wanted to do the same, gather important information from IPU and be able to use it for Reporting or creating collection queries.

I’ve taken Jason’s script and modified it… a lot.  All of his plumbing is still in place (functionality to add information to WMI & Registry), but I’ve added a lot of logic around using the script for different functions.

The script is now broken into 3 sections, OSD (Operating System Deployment), CS (Compatibility Scan), IPU (In Place Upgrade).  Using TS Variables, the script will run different sections of the script.  This allows me to use the same script in numerous scenarios.
First, I’ll show you results, and then go into details about how it’s done.  But I feel it’s easier to understand the script and process if you can see the end product.

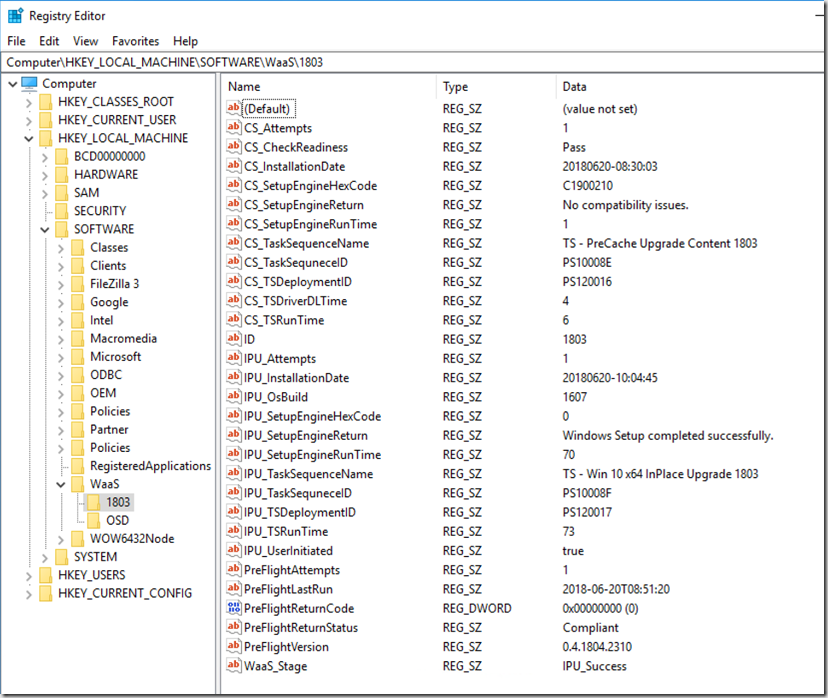
Registry, Creates WaaS Key, then subkeys for OSD and IPU Build Numbers to keep thing separated for historical data.  If you’re a Reg2Mof person, this is probably the way you’ll want to go.

OSD Info:
image

CS & IPU:
CompatScan = Green
IPU = Yellow
Both Processes = Blue (IPU overwrites CS info)

image

WMI: (Makes it easy to import into Hardware Inventory, but the data is spread out a bit instead of in one nice view)
Classes: CompatScan / IPU / OSD
Instances: Build Number
Prosperities: Details from each process

image

SQL: (When using WMI & Hardware Inventory)

OSD:
image
CompatScan:
image
IPU:
image

Used for Report:
image


Ok, now to the “How” section, the Script:
Requires Several TS Variables to function, will cover after script.

<#
.SYNOPSIS
	Sets information during OSD.
   
.DESCRIPTION 
    This script will add build, task sequence, and other information to the OS so that it can later be examined or inventoried.
    Information can be added to the registry, WMI, or both.

.PARAMETER Registry
    This switch will add information to the following location:
        - Registry

.PARAMETER WMI
    This switch will add information to the following location:
        - WMI Repository
    
.EXAMPLE
     Set-OSDInfo.ps1 -WMI -Registry

     Will add all information to the following locations:
        - Registry
        - WMI Repository 

.NOTES
    Modified from the versions by Stephane van Gulick from www.powershellDistrict.com
	V1.1, 2016-5-6: Added, values for Dtae/Time, OS Image ID, UEFI, and Launch Mode
    V1.1G, 2018-5-12: GaryTown Modified Version.  Seperated OSD, IPU & CompatScan sections
     -Includes gathering Setup.exe return code and logging that in "normal terms"
     -Requires several TS variables for this to work
        -SetOSDInfoType (OSD / CS / IPU)
        -SMSTS_FinishTSTime (Time at the end of the TS, used to figure out how long it took)
        -SMSTS_StartTSTime (Time when TS starts, used to figure out how long it took)
        -SMSTS_FinishUpgradeTime (Time at end of Upgrade Step, figure out how long setup engine ran)
        -SMSTS_StartUpgradeTime (Time at star of Upgrade Step, figure out how long setup engine ran)
        -OsBuildVersion (used to keep Build Upgrades seperate)
        -SMSTS_DMDepartment (Purely Environmental, can modify to fit needs, or remove)
        -SMSTS_DMLocation (Purely Environmental, can modify to fit needs, or remove)
        -CheckReadinessResult (Created if CheckReadiness Step Fails)
.LINK
	http://blog.configmgrftw.com
	http://garytown.com for Modifications to Jason's Original Script
#>
[cmdletBinding()]
Param(
        [Parameter(Mandatory=$false)][switch]$WMI,
        [Parameter(Mandatory=$false)][switch]$Registry,
        [Parameter(Mandatory=$false)][String]$Namespace,
        [Parameter(Mandatory=$false)][String]$Class,
        [Parameter(Mandatory=$true)][String]$ID,
        [Parameter(Mandatory=$false)][String]$AttributePrefix = "WaaS_"
)
# Start-Transcript >> $env:temp\PowerShellTranscript.log

Function Get-WMINamespace
{
  <#
	.SYNOPSIS
		Gets information about a specified WMI namespace.

	.DESCRIPTION
		Returns information about a specified WMI namespace.

    .PARAMETER  Namespace
		Specify the name of the namespace where the class resides in (default is "root\cimv2").

	.EXAMPLE
		Get-WMINamespace
        Lists all WMI namespaces.

	.EXAMPLE
		Get-WMINamespace -Namespace cimv2
        Returns the cimv2 namespace.

	.NOTES
		Version: 1.0

	.LINK
		http://blog.configmgrftw.com

#>
[CmdletBinding()]
	Param
    (
        [Parameter(Mandatory=$false,valueFromPipeLine=$true)][string]$Namespace
	)  
    begin
	{
		Write-Verbose "Getting WMI namespace $Namespace"
    }
    Process
	{
        if ($Namespace)
        {
            $filter = "Name = '$Namespace'"
            $return = Get-WmiObject -Namespace "root" -Class "__namespace" -filter $filter
        }
		else
		{
            $return = Get-WmiObject -Namespace root -Class __namespace
        }
    }
    end
	{
        return $return
    }
}

Function New-WMINamespace
{
<#
	.SYNOPSIS
		This function creates a new WMI namespace.

	.DESCRIPTION
		The function creates a new WMI namespsace.

    .PARAMETER Namespace
		Specify the name of the namespace that you would like to create.

	.EXAMPLE
		New-WMINamespace -Namespace "ITLocal"
        Creates a new namespace called "ITLocal"
		
	.NOTES
		Version: 1.0

	.LINK
		http://blog.configmgrftw.com

#>
[CmdletBinding()]
	Param(
        [Parameter(Mandatory=$true,valueFromPipeLine=$true)][string]$Namespace
	)

	if (!(Get-WMINamespace -Namespace "$Namespace"))
	{
		Write-Verbose "Attempting to create namespace $($Namespace)"

		$newNamespace = ""
		$rootNamespace = [wmiclass]'root:__namespace'
        $newNamespace = $rootNamespace.CreateInstance()
		$newNamespace.Name = $Namespace
		$newNamespace.Put() | out-null
		
		Write-Verbose "Namespace $($Namespace) created."

	}
	else
	{
		Write-Verbose "Namespace $($Namespace) is already present. Skipping.."
	}
}

Function Get-WMIClass
{
  <#
	.SYNOPSIS
		Gets information about a specified WMI class.

	.DESCRIPTION
		Returns the listing of a WMI class.

	.PARAMETER  ClassName
		Specify the name of the class that needs to be queried.

    .PARAMETER  Namespace
		Specify the name of the namespace where the class resides in (default is "root\cimv2").

	.EXAMPLE
		get-wmiclass
        List all the Classes located in the root\cimv2 namespace (default location).

	.EXAMPLE
		get-wmiclass -classname win32_bios
        Returns the Win32_Bios class.

	.EXAMPLE
		get-wmiclass -Class MyCustomClass
        Returns information from MyCustomClass class located in the default namespace (root\cimv2).

    .EXAMPLE
		Get-WMIClass -Namespace ccm -Class *
        List all the classes located in the root\ccm namespace

	.EXAMPLE
		Get-WMIClass -NameSpace ccm -Class ccm_client
        Returns information from the cm_client class located in the root\ccm namespace.

	.NOTES
		Version: 1.0

	.LINK
		http://blog.configmgrftw.com

#>
[CmdletBinding()]
	Param
	(
		[Parameter(Mandatory=$false,valueFromPipeLine=$true)][string]$Class,
        [Parameter(Mandatory=$false)][string]$Namespace = "cimv2"
	)  
    begin
	{
		Write-Verbose "Getting WMI class $Class"
    }
    Process
	{
		if (Get-WMINamespace -Namespace $Namespace)
		{
			$namespaceFullName = "root\$Namespace"

            Write-Verbose $namespaceFullName
		
			if (!$Class)
			{
				$return = Get-WmiObject -Namespace $namespaceFullName -Class * -list
			}
			else
			{
				$return = Get-WmiObject -Namespace $namespaceFullName -Class $Class -list
			}
		}
		else
		{
			Write-Verbose "WMI namespace $Namespace does not exist."
			
			$return = $null
		}
    }
    end
	{
        return $return
    }
}

Function New-WMIClass
{
<#
	.SYNOPSIS
		This function creates a new WMI class.

	.DESCRIPTION
		The function create a new WMI class in the specified namespace.
        It does not create a new namespace however.

	.PARAMETER Class
		Specify the name of the class that you would like to create.

    .PARAMETER Namespace
		Specify the namespace where class the class should be created.
        If not specified, the class will automatically be created in "root\cimv2"

    .PARAMETER Attributes
		Specify the attributes for the new class.

    .PARAMETER Key
		Specify the names of the key attribute (or attributes) for the new class.

	.EXAMPLE
		New-WMIClass -ClassName "OSD_Info"
        Creates a new class called "OSD_Info"
    .EXAMPLE
        New-WMIClass -ClassName "OSD_Info1","OSD_Info2"
        Creates two classes called "OSD_Info1" and "OSD_Info2" in the root\cimv2 namespace

	.NOTES
		Version: 1.0

	.LINK
		http://blog.configmgrftw.com

#>
[CmdletBinding()]
	Param(
		[Parameter(Mandatory=$true,valueFromPipeLine=$true)][string]$Class,
        [Parameter(Mandatory=$false)][string]$Namespace = "cimv2",
        [Parameter(Mandatory=$false)][System.Management.Automation.PSVariable[]]$Attributes,
        [Parameter(Mandatory=$false)][string[]]$Key
	)

	$namespaceFullName = "root\$Namespace"
	
	if (!(Get-WMINamespace -Namespace $Namespace))
	{
		Write-Verbose "WMI namespace $Namespace does not exist."

	}

    elseif (!(Get-WMIClass -Class $Class -NameSpace $Namespace))
	{
		Write-Verbose "Attempting to create class $($Class)"
			
		$newClass = ""
		$newClass = New-Object System.Management.ManagementClass($namespaceFullName, [string]::Empty, $null)
		$newClass.name = $Class

        foreach ($attr in $Attributes)
        {
            $attr.Name -match "$AttributePrefix(?<attributeName>.*)" | Out-Null
            $attrName = $matches['attributeName']

            $newClass.Properties.Add($attrName, [System.Management.CimType]::String, $false)
            Write-Verbose "   added attribute: $attrName"
        }

        foreach ($keyAttr in $Key)
        {
            $newClass.Properties[$keyAttr].Qualifiers.Add("Key", $true)
            Write-Verbose "   added key: $keyAttr"
        }


		$newClass.Put() | out-null
			
		Write-Verbose "Class $($Class) created."
	}
	else
	{
		Write-Verbose "Class $($Class) is already present. Skipping..."
    }

}

Function New-WMIClassInstance
{
    <#
	.SYNOPSIS
		Creates a new WMI class instance.

	.DESCRIPTION
		The function creates a new instance of the specified WMI class.

	.PARAMETER  Class
		Specify the name of the class to create a new instance of.

	.PARAMETER Namespace
        Specify the name of the namespace where the class is located (default is Root\cimv2).

	.PARAMETER Attributes
        Specify the attributes and their values using PSVariables.

	.EXAMPLE
        $MyNewInstance = New-WMIClassInstance -Class OSDInfo
        
        Creates a new instance of the WMI class "OSDInfo" and sets its attributes.
		
	.NOTES
		Version: 1.0

	.LINK
		http://blog.configmgrftw.com

#>

[CmdletBinding()]
	Param
    (
		[Parameter(Mandatory=$true)]
        [ValidateScript({
            $_ -ne ""
        })][string]$Class,
        [Parameter(Mandatory=$false)][string]$Namespace="cimv2",
        [Parameter(Mandatory=$false)][System.Management.Automation.PSVariable[]]$Attributes
	)

    $classPath = "root\$($Namespace):$($Class)"
    $classObj = [wmiclass]$classPath
    $classInstance = $classObj.CreateInstance()

    Write-Verbose "Created instance of $Class class."

    foreach ($attr in $Attributes)
    {
        $attr.Name -match "$AttributePrefix(?<attributeName>.*)" | Out-Null
        $attrName = $matches['attributeName']

        if ($attr.Value) 
        {
            $attrVal = $attr.Value
        } 
        else 
        {
            $attrVal = ""
        }

        $classInstance[$attrName] = $attrVal
        "   added attribute value for $($attrName): $($attrVal)" >> $env:temp\newWMIInstance.log 
    }

    $classInstance.Put()
}

Function New-RegistryItem
{
<#
.SYNOPSIS
	Sets a registry value in the specified key under HKLM\Software.
   
.DESCRIPTION 
    Sets a registry value in the specified key under HKLM\Software.
	
	
.PARAMETER Key
    Species the registry path under HKLM\SOFTWARE\ to create.
    Defaults to OperatingSystemDeployment.


.PARAMETER ValueName
    This parameter specifies the name of the Value to set.

.PARAMETER Value
    This parameter specifies the value to set.
    
.Example
     New-RegistryItem -ValueName Test -Value "abc"

.NOTES
	-Version: 1.0
	
#>


    [cmdletBinding()]
    Param(


        [Parameter(Mandatory=$false)]
        [string]$Key = "OperatingSystemDeployment",

        [Parameter(Mandatory=$true)]
        [string]$ValueName,

        [Parameter(Mandatory=$false)]
        [string]$Value
        
    )
    begin
    {
        $registryPath = "HKLM:SOFTWARE\WaaS\$ID"
    }
    Process
    {
        if ($registryPath -eq "HKLM:SOFTWARE\Microsoft\Windows\CurrentVersion\Uninstall\")
        {
            write-verbose "The registry path that is tried to be created is the uninstall string.HKLM:SOFTWARE\Microsoft\Windows\CurrentVersion\Uninstall\."
            write-verbose "Creating this here would have as consequence to erase the whole content of the Uninstall registry hive."
                        
            exit 
        }

        ##Creating the registry node
        if (!(test-path $registryPath))
        {
            write-verbose "Creating the registry key at : $($registryPath)."
            
            try
            {
                New-Item -Path $registryPath -force -ErrorAction stop | Out-Null
            }
            catch [System.Security.SecurityException]
            {
                write-warning "No access to the registry. Please launch this function with elevated privileges."
            }
            catch
            {
                write-host "An unknowed error occured : $_ "
            }
        }
        else
        {
            write-verbose "The registry key already exists at $($registryPath)"
        }

        ##Creating the registry string and setting its value
        write-verbose "Setting the registry string $($ValueName) with value $($Value) at path : $($registryPath) ."

        try
        {
            New-ItemProperty -Path $registryPath  -Name $ValueName -PropertyType STRING -Value $Value -Force -ErrorAction Stop | Out-Null
        }
        catch [System.Security.SecurityException]
        {
            write-host "No access to the registry. Please launch this function with elevated privileges."
        }
        catch
        {
            write-host "An unknown error occured : $_ "
        }
    }

    End
    {
    }
}


try
{
    $tsenv = New-Object -COMObject Microsoft.SMS.TSEnvironment
}
catch
{
	Write-Verbose "Not running in a task sequence."
}

$keyValue = "ID"

# New-Variable -Name "$($AttributePrefix)InstallationDate" -Value $(get-date -uformat "%Y%m%d-%T")

 New-Variable -Name "$($AttributePrefix)$keyValue" -Value $ID


if ($tsenv)
{
        #Get what kind of TS: CompatScan (CS) / InPlace Uprade (IPU) / Operating System Deployment (OSD) - Must have Step in TS that lets script know
        $SetOSDInfoType = $tsenv.Value("SetOSDInfoType")
        #Gets the Time in Minutes it takes to run Task Sequence - Requires you to set a Start Variable & Finish Variable (2 steps in TS) 
        $Difference = ([datetime]$TSEnv.Value('SMSTS_FinishTSTime')) - ([datetime]$TSEnv.Value('SMSTS_StartTSTime')) 
        $Difference = [math]::Round($Difference.TotalMinutes)
        #Gets CompatScan Results and Write Code & Friendly Name to Registry
        
        if ($SetOSDInfoType -eq 'IPU' -or $SetOSDInfoType -eq 'CS')
        {
        [int64] $decimalreturncode = $tsenv.Value("_SMSTSOSUpgradeActionReturnCode")
        #[int64] $hexreturncode = 0xC1900210
        $hexreturncode = "{0:X0}" -f [int64]$decimalreturncode

                $WinIPURet = @(
            @{ Err = "C1900210"; Msg = 'No compatibility issues.'}
            @{ Err = "C1900208"; Msg = 'Incompatible apps or drivers.' }
            @{ Err = "C1900204"; Msg = 'Selected migration choice is not available.' }
            @{ Err = "C1900200"; Msg = 'Not eligible for Windows 10.' }
            @{ Err = "C190020E"; Msg = 'Not enough free disk space.' }
            @{ Err = "C1900107"; Msg = 'Unsupported Operating System.' }
            @{ Err = "0"; Msg = 'Windows Setup completed successfully.' }
            )
        $ErrorMsg = $winipuret | ? err -eq $hexreturncode  | % Msg

        #Gets the Time in minutes it takes to run the Setup.exe Step (CS or IPU only)
        $DifferenceUpgrade = ([datetime]$TSEnv.Value('SMSTS_FinishUpgradeTime')) - ([datetime]$TSEnv.Value('SMSTS_StartUpgradeTime')) 
        $DifferenceUpgrade = [math]::Round($DifferenceUpgrade.TotalMinutes)
        }

	$taskSequenceXML = $tsenv.Value("_SMSTSTaskSequence")
	$imageIDElement = @(Select-Xml -Content $taskSequenceXML -XPath "//variable[@name='ImagePackageID']")
	 
#Run These during OSD
    if ($SetOSDInfoType -eq 'OSD')
    {
        New-Variable -Name "$($AttributePrefix)OSD_BootImageID" -Value $tsenv.Value("_SMSTSBootImageID")
        New-Variable -Name "$($AttributePrefix)OSD_InstallationMethod" -Value $tsenv.Value("_SMSTSMediaType")
        New-Variable -Name "$($AttributePrefix)OSD_OSImageID" -Value $imageIDElement[0].node.InnerText
        New-Variable -Name "$($AttributePrefix)OSD_UserInitiated" -Value $tsenv.Value("_SMSTSUserStarted")
        New-Variable -Name "$($AttributePrefix)OSD_OsBuild" -Value $tsenv.Value("OsBuildVersion")
        New-Variable -Name "$($AttributePrefix)OSD_DMDepartment" -Value $tsenv.Value("SMSTS_DMDepartment")
	    New-Variable -Name "$($AttributePrefix)OSD_DMLocation" -Value $tsenv.Value("SMSTS_DMLocation")
        New-Variable -Name "$($AttributePrefix)OSD_TSRunTime" -Value "$Difference"
        New-Variable -Name "$($AttributePrefix)OSD_TaskSequenceName" -Value $tsenv.Value("_SMSTSPackageName")
        New-Variable -Name "$($AttributePrefix)OSD_TaskSequneceID" -Value $tsenv.Value("_SMSTSPackageID")
        New-Variable -Name "$($AttributePrefix)OSD_TSDeploymentID" -Value $tsenv.Value("_SMSTSAdvertID")
        New-Variable -Name "$($AttributePrefix)OSD_InstallationDate" -Value $(get-date -uformat "%Y%m%d-%T")
    }

#Run These if IPU
    if ($SetOSDInfoType -eq 'IPU')
    {
        New-Variable -Name "$($AttributePrefix)IPU_UserInitiated" -Value $tsenv.Value("_SMSTSUserStarted")
        New-Variable -Name "$($AttributePrefix)IPU_OsBuild" -Value $tsenv.Value("OsBuildVersion")
	    New-Variable -Name "$($AttributePrefix)IPU_DMDepartment" -Value $tsenv.Value("SMSTS_DMDepartment")
	    New-Variable -Name "$($AttributePrefix)IPU_DMLocation" -Value $tsenv.Value("SMSTS_DMLocation")
        New-Variable -Name "$($AttributePrefix)IPU_TSRunTime" -Value "$Difference"
        New-Variable -Name "$($AttributePrefix)IPU_TaskSequenceName" -Value $tsenv.Value("_SMSTSPackageName")
        New-Variable -Name "$($AttributePrefix)IPU_TaskSequneceID" -Value $tsenv.Value("_SMSTSPackageID")
        New-Variable -Name "$($AttributePrefix)IPU_TSDeploymentID" -Value $tsenv.Value("_SMSTSAdvertID")
        New-Variable -Name "$($AttributePrefix)IPU_SetupEngineReturn" -Value "$ErrorMsg"
        New-Variable -Name "$($AttributePrefix)IPU_SetupEngineHexCode" -Value "$hexreturncode"
        New-Variable -Name "$($AttributePrefix)IPU_SetupEngineRunTime" -Value "$DifferenceUpgrade"
        New-Variable -Name "$($AttributePrefix)IPU_InstallationDate" -Value $(get-date -uformat "%Y%m%d-%T")
        New-Variable -Name "$($AttributePrefix)WaaS_Stage" -Value "IPU Complete"
            # Custom Created Variable if Step "Check Readiness" Fails
            if ($tsenv.Value("CheckReadinessResult") -ne "Pass")
            {
                New-Variable -Name "$($AttributePrefix)IPU_CheckReadiness" -Value $tsenv.Value("CheckReadinessResult")
                New-Variable -Name "$($AttributePrefix)Waas_Stage" -Value "IPU Fail CheckReadiness"
            }
        #Increments the ammount of times the IPU TS runs
        try { [int]$Value = Get-ItemPropertyValue -Path "HKLM:SOFTWARE\WaaS\$ID" -Name "IPU_Attempts" -ErrorAction SilentlyContinue } catch {}
        New-Variable -Name "$($AttributePrefix)IPU_Attempts" -Value ($Value + 1).ToString() 
        }
         
 
#This Section runs for CompatScan Task Seqeunces
    if ($SetOSDInfoType -eq 'CS')
    {    
        New-Variable -Name "$($AttributePrefix)CS_TaskSequenceName" -Value $tsenv.Value("_SMSTSPackageName")
        New-Variable -Name "$($AttributePrefix)CS_TaskSequneceID" -Value $tsenv.Value("_SMSTSPackageID")
        New-Variable -Name "$($AttributePrefix)CS_TSDeploymentID" -Value $tsenv.Value("_SMSTSAdvertID")
        New-Variable -Name "$($AttributePrefix)CS_SetupEngineReturn" -Value "$ErrorMsg"
        New-Variable -Name "$($AttributePrefix)CS_SetupEngineHexCode" -Value "$hexreturncode"
        New-Variable -Name "$($AttributePrefix)CS_SetupEngineRunTime" -Value "$DifferenceUpgrade"
        New-Variable -Name "$($AttributePrefix)CS_TSRunTime" -Value "$Difference"
        New-Variable -Name "$($AttributePrefix)CS_InstallationDate" -Value $(get-date -uformat "%Y%m%d-%T")
        #New-Variable -Name "$($AttributePrefix)WaaS_Stage" -Value "CS Completed Successfully"
     # Custom Created Variable if Step "Check Readiness" Fails
         
          
         if ($tsenv.Value("CheckReadinessResult") -ne "Pass")
            {
                New-Variable -Name "$($AttributePrefix)CS_CheckReadiness" -Value $tsenv.Value("CheckReadinessResult")
            }
      
         if ( $hexreturncode -eq "C1900210") 
            {
               New-Variable -Name "$($AttributePrefix)WaaS_Stage" -Value "CS Completed Successfully"
            }
         Else
            {
             New-Variable -Name "$($AttributePrefix)WaaS_Stage" -Value "CS Failed"
            }
            
        #Increments the ammount of times the Precache CompatScan TS runs
        try { [int]$Value = Get-ItemPropertyValue -Path "HKLM:SOFTWARE\WaaS\$ID" -Name "CS_Attempts" -ErrorAction SilentlyContinue } catch {}
        New-Variable -Name "$($AttributePrefix)CS_Attempts" -Value ($Value + 1).ToString() 
                   
    }


    #$customInfo = @()
    #$customInfo = $tsenv.getVariables() | where {$_ -match "$($AttributePrefix).*"}

    #Foreach ($infoItem in $customInfo)
    #{
    #    New-Variable -Name $infoItem -Value $tsenv.value($infoItem)
    #}

}

$customAttributes = Get-Variable -Name "$AttributePrefix*"

if ($PSBoundParameters.ContainsKey("WMI"))
{
    New-WMINamespace -Namespace $Namespace
    New-WMIClass -Namespace $Namespace -Class $Class -Attributes $customAttributes -Key $keyValue
    New-WMIClassInstance -Namespace $Namespace -Class $Class -Attributes $customAttributes
}

if ($PSBoundParameters.ContainsKey("Registry"))
{
    foreach ($attr in $customAttributes)
    {
        $attr.Name -match "$AttributePrefix(?<attributeName>.*)" | Out-Null
        $attrName = $matches['attributeName']

        if ($attr.Value) 
        {
            $attrVal = $attr.Value
        } 
        else 
        {
            $attrVal = ""
        }
        
        Write-Verbose "Setting registry value named $attrName to $attrVal"


        New-RegistryItem -Key "$($Class)\$ID" -ValueName $attrName -Value $attrVal

    }
}

Step in Task Sequences
Required Variables in TS:
SetOSDInfoType: Set to OSD / CS / IPU - Tells the Script which section to run.

I set the osdbuildversion variable in the beginning of the TS, which gets used in the script & command line.

image

SMSTS_StartTSTime - Records time at the very start of the TS

powershell.exe -command "&{$tsenv = New-Object -COMObject Microsoft.SMS.TSEnvironment; $tsenv.Value('SMSTS_StartTSTime') = Get-Date}"

SMSTS_FinishTSTime - Records time near the end of the TS, used in the script to calculate run time of TS

powershell.exe -command "&{$tsenv = New-Object -COMObject Microsoft.SMS.TSEnvironment; $tsenv.Value('SMSTS_FinishTSTime') = Get-Date}"

CheckReadinessResult: If Check Readiness Fails, Set to FAIL

SMSTS_StartUpgradeTime - Records time right before Upgrade Step Starts.

powershell.exe -command "&{$tsenv = New-Object -COMObject Microsoft.SMS.TSEnvironment; $tsenv.Value('SMSTS_StartUpgradeTime') = Get-Date}"

SMSTS_FinishUpgradeTime - Records time right after Upgrade Step finishes, to calculate upgrade time

powershell.exe -command "&{$tsenv = New-Object -COMObject Microsoft.SMS.TSEnvironment; $tsenv.Value('SMSTS_FinishUpgradeTime') = Get-Date}"

SMSTS_DMDepartment - Collection Variable - Specific to my Test Lab to help track which Department a computer belongs to
SMSTS_DMLocation - Collection Variable - Specific to my Test Lab to help track which Branch computer belongs to
- These are just for sample to show you can collect information like this during IPU / OSD.  Recommend Customization them for your environment or removing them from the script.


OSD: Run Powershell Script:

-ID "OSD" -WMI -Registry -Namespace "GARYTOWN" -Class "OSD" –AttributePrefix "OSD_info"

image

CompatScan: Run PowerShell Script

-ID "%osdbuildversion%" -WMI -Registry -Class "CompatScan" -Namespace "GARYTOWN"

image

IPU: Run PowerShell Script:

-ID "%osdbuildversion%" -WMI -Registry -Class "IPU" -Namespace "GARYTOWN"

image


Add to Hardware Inventory: Set Classes –> Add –> Connect –> Computer Name of machine you ran the script on and you confirmed the WMI NameSpace and values are created –> Ensure you change the namespace to the namespace you specified in the TS-> Connect
image

Check the Boxes and click OK: (I’ve already done this, which is why they say “exists” in this screen capture, and the class names are greyed out, but when you do it the first time, you’ll be able to check those boxes)
image

You can then verify all the fields then and check the ones you want. If you change the script in the future, you’ll need to come back in here and modify what you’ve checked.
OSD:
image
CompatScan:
image

IPU:
image

Used in Collection Queries:


And now, as machines run through your process, and hardware inventory is collected, you’ll have useful data to provide.

If you have any questions, let me know.  I've been running this so long, that I might have missed a step I needed to set it all up originally.

Published originally on garytown.com


Test Low Disk Space / Create Large Test File

$
0
0

So I stole this code from my friend Keith G, who provided it to assist with testing scenarios to see if our safe guards would work.
Basically, the 1 line command will check your drive, then create a dynamically sized file to leave “XX” GB remaining.  In my command, I leave only 15GB Free, which is low enough to trigger a failure on our in place upgrades.  Then I can test to make sure the the IPU TS fails the way I expect, running the proper remediation steps, and records the metrics for reporting.

Code: (run in elevated PowerShell Console)

get-volume c | % {$_.SizeRemaining - 15GB} |  % {Fsutil file createnew c:\TestFile.id $_}

So I made it into an App, I’ve added a few items into the app model to allow me to “install” it quickly on a machine to test failure scenarios.

App Code:

powershell.exe -command "get-volume c | % {$_.SizeRemaining - 15GB} |  % {Fsutil file createnew c:\TestFile.id $_}"

image

image

In action on Test Machine: Ran App, it created a 19GB File to get the HDD under 15GB Free

And now, my TS fails during Check Readiness, so I can make sure all of the metrics are being recorded.

WaaS–Post 1–PreCache Compat Scan TS

$
0
0

So this will be the first of several posts, well, it’s sorta the second, this heavily relies on the Script I posted for writing values to registry & WMI a few posts ago, however I’ve made several modifications to it since then, and have done A LOT of testing. Hence my last post about testing Low Disk Space machines.

WaaS Process, as Designed by Mike Terrill & Keith Garner quick overview:

  1. PreAssessment:  Set of Rules run against hardware inventory data to rule out machines that be known to fail the upgrade. Rules include:
    1. Hardware Checks
      1. Models
      2. Free Disk Space
      3. Memory
    2. Software Checks (Software we know that needs to be at specific versions to survive IPU, or not block it)
      1. 3rd Party Encryption Version level
      2. 3rd Party AV Version level
      3. Several other Apps
    3. General Checks
      1. Last HWInv Date
      2. Last MP Checkin
      3. OS / Build / OS Arch
      4. CCM Cache Size
  2. PreCache / Compat Scan (Task Sequence): After it passes all of the rules, the computer then added to a collection targeted with this TS.  The TS is setup as a Required Deployment, and set to Pre-Download Content, and Download all Content before starting the TS.  Then will dynamically download the driver packages, run the Check Readiness, and then Compat Scan.
  3. Schedule for Upgrade: After it has been cached, and passes the compat scan, the machines can be schedule (added to collection targed with the upgrade).

That’s a really quick overview of how we’ve setup WaaS, we went over this in great detail @ MMS, and I’d expect Mike Terrill to eventually blog that detail, I just don’t want to steal all of this thunder, but felt you needed a little overview to explain where this TS fits in.

This post will be covering PreCaching your Upgrade Media and Drivers, along with running the Compatibility Scan.

Here is what the TS looks like:
image

So Lets break this down:

  • Set SMSTSPersistContent & Set SMSTSPerserveContent – Set both to true so that when you download the packages for the TS, it saves it to the CCMCache so it doesn’t remove after the TS Completes.
    image
    image
  • Set OSD Info Type & Set OS Build Version.  Variables used in scripts and steps later on.
    image
    image
  • Set WaaS_Stage (Sets registry Key, Eventually I want to go back and make this write to WMI as well, just haven’t had time)
    image
  • Set TS Var – Sets SMSTS_StartTSTime to the current time, to be used to calculate how long the TS ran.
    image
  • Power Settings Change – Details HERE
    • Set TS Var “PowerPlan” to Active Power Plan – This is grabbing the current power plan running and places that info into a variable
    • Set Power Options – High Performance – Sets the machine to High Performance power plan, to hopefully speed up the process
  • Set Driver and Content Download (Group)
    • Set Dynamic Variables (Model & Package)  This is a simple way to map Models to Packages of Drivers.
      image
    • Download Drivers and Content (Group)
      • Set Download Start Time
        image
      • Set SMSTSDownloadProgram to Null
        image
      • Set Driver Download Variables
        image
      • Download Driver Package
        image
      • Reset Download Variables
        image
      • Set Download Finish Time
        image
  • Storage Cleanup (Group) Runs if Free Space < 20GB Free – Not going to go into in this post
  • Check Readiness (RAM & Free Space)
    • Set CheckReadiness Pass (sets variable to “Pass”) by default, if an upcoming step fails, it updates
      image
    • Check Readiness – Memory
      image
    • Set CheckReadiness PHail Memory (If last step fails, it sets CheckReadiness to “Memory”
      image image
    • Check Readiness – Free Space
      image
    • Set CheckReadiness PHail Free Space (if last step fails, it sets CheckReadiness to “FreeSpace”
      image image
  • Compatibility  Scan Section (Group) – Runs if CheckReadiness = Pass
    image
    • Add Key to remove from Provisioning Mode – Creates run once key with command to remove from provisioning mode (safe guard)
      image
    • Set Start Upgrade Time
      image
    • OS Compat Scan – Upgrade Step set to Compat Scan Only
      image
    • Set Finish Upgrade Time
      image
    • Delete Key to remove from Provisioning mode
      image
  • Power Settings Restore
    • Set Power Options – Balanced (Runs if PowerPlan = Balanced)
    • Set Power Options – Power saver (Runs if PowerPlan = Power saver)
  • Set TS Finish Time
    image
  • Tweak – SetOSDInfo PS – Runs the script that writes all of the metrics to WMI & Registry
    image
  • Send Hardware Inventory
    image
  • Copy Logs to Server (if CompatScan was not successful)
    image
  • PHail Section
    • Set TS Var ReturnErrorCode” – Setup No Run – The will set the Variable ReturnErrorCode to 20 (arbitrary number that is not 0) if compatscan never ran
      image image
    • Set TS Var “ReturnErrorCode” – Setup Ran – This will set the ReturnErrorCode to the Return Code of the CompatScan
      imageimage
    • PHail if CompatScan PHailed
      image
      image


And there you have it, the PreCache Compat Scan TS
Sorry, all of the steps are just images, but the actual TS is available for download HERE

Deployment

General: Defaults.  You might be asking, why not use the "Pre-Download Content..." option, well, that only comes into play if the deployment is "Available" vs "Required".  Since it is a required Deployment, it will start to download right away anyway.  If you're making the TS "Available" to a group for testing, it would probably be worth checking that box.

Scheduling:  We have it set to run each day @ 8PM.  Once it runs successfully we have it automatically move to the next collection, if it fails, it will just try again the next night, hopefully you've remediated anything that prevented it from running properly.  Change the schedule to fit your environment.  In my lab, this works fine, as I have collection queries move it out once it is successful. That's another blog post down the road.

User Experience... HIDDEN... we don't want the users to even know this is going on.

Distribution Points: Download all content locally before starting the task sequence.  Question: How long do we want the TS to run??  Answer: As short as possible.  Pre-Download all content also ensures that we have all of the content needed before starting.  If it can't get the content it doesn't start.  Less chance of failure during the actual TS.  Consider this, you have a remote user with little bandwidth, it will take hours for the content to download, if you didn't have it download the content ahead of time, that TS would run for hours, with a high change of the user rebooting, or turning off the machine in the middle of the TS.  Anyway, I think you get the point, download the content prior to starting the TS.


Example of Results (Fail Low Free Disk Space)
image

Example of Results (SUCCESS!)

image
Note, if you look at these metrics, you’ll be like… wait a minute, how was your Task Sequence run time less than the time it took to download the drivers.  Well, it downloaded the Drivers in Run 1, which then failed the Free Space Rule.  During Run 2, it had already downloaded the drivers, so it didn’t need to waste those 4 minutes again, and so the entire 2nd run only took 3 minutes.  The Script to capture this info, writes the time it took to download drivers, the 2nd time you run it, it checks that key, if it’s greater than 0, it will leave it alone, and keep the current value from the last run.


The Content needed for my IPU is now in my CCM Cache, which will make the IPU start instantly, no need to wait for the download. (Upgrade, Drivers & Scripts Packages)
image

If you need any clarifications on this post, please let me know and I'll try to update it.  When you work on these things every day, it's easy to miss explaining something.

Originally Posted on GARYTOWN.COM – 2018.06.05

Windows 10 Lock Screen

$
0
0

So, you think you’re setting the lock screen, just to have OSD finish and be like “Why is the lock screen missing and showing a dark blueish color?” or “Argh, it’s the stinking Windows default lock screen, not the one I wanted”. Perhaps you have a lab, and don’t activate your PC’s, so you get the rotating Bing Picture of the day, which is actually pretty cool and all, unless you’re trying to test Lock Screens.  Thanks to Doug (managedoug.com) for bringing this to my attention and having me dig into it a bit more.

I’ve got Several Steps to control this during OSD which include Copying Files over the default lock screen images, and setting registry keys, basically depends on exactly what outcome you’re looking for.

Scenario 1, you want to set the Lock Screen and NEVER allow the user to change it.

Scenario 2, you’re cool with the user changing it, but want to set it to your own custom default.

To accomplish both, there are several things in common you need to do, so I’ll start with the steps you need to do for either situation, then break apart the single additional step that enables scenario 1.

image

  • Tweak – Replace Default LockScreen Step 1
    image
    cmd.exe /c takeown /f C:\Windows\Web\Screen\*.* & cmd.exe /c icacls C:\Windows\Web\Screen\*.* /Grant System:(F)
  • Tweak – Replace Default LockScreen Step 2
    image
    cmd.exe /c copy WallPapersLockScreens\lego-img1.jpg C:\Windows\Web\Screen\img100.jpg /Y & cmd.exe /c copy WallPapersLockScreens\lego-img1.jpg C:\Windows\Web\Screen\img105.jpg /Y
  • Tweak – Mount ntuser.dat as defuser
    image
    • reg.exe load HKEY_LOCAL_MACHINE\defuser c:\users\default\ntuser.dat

      Tweak – LockScreen Tools TIps & Rotation Disable
      image
      cmd.exe /c REG ADD "HKEY_LOCAL_MACHINE\defuser\SOFTWARE\Microsoft\Windows\CurrentVersion\ContentDeliveryManager" /V RotatingLockScreenOverlayEnabled /T REG_DWORD /D 0 /F & cmd.exe /c REG ADD "HKEY_LOCAL_MACHINE\defuser\SOFTWARE\Microsoft\Windows\CurrentVersion\ContentDeliveryManag​er" /T REG_DWORD /V RotatingLockScreenEnabled /D 0 /F
    • Tweak – LockScreen BING Rotation Disable
      image
      cmd.exe /c REG ADD "HKEY_LOCAL_MACHINE\defuser\SOFTWARE\Microsoft\Windows\CurrentVersion\Lock Screen\Creative" /V LockImageFlags /T REG_DWORD /D 00000000 /F & cmd.exe /c REG ADD "HKEY_LOCAL_MACHINE\defuser\SOFTWARE\Microsoft\Windows\CurrentVersion\Lock Screen\Creative" /V LockScreenOptions /T REG_DWORD /D 00000000 /F & cmd.exe /c REG ADD "HKEY_LOCAL_MACHINE\defuser\SOFTWARE\Microsoft\Windows\CurrentVersion\Lock Screen\Creative" /V CreativeId /T REG_SZ /D "" /F  & cmd.exe /c REG ADD "HKEY_LOCAL_MACHINE\defuser\SOFTWARE\Microsoft\Windows\CurrentVersion\Lock Screen\Creative" /V DescriptionText /T REG_SZ /D "" /F & cmd.exe /c REG ADD "HKEY_LOCAL_MACHINE\defuser\SOFTWARE\Microsoft\Windows\CurrentVersion\Lock Screen\Creative" /V ActionText /T REG_SZ /D "" /F & cmd.exe /c REG ADD "HKEY_LOCAL_MACHINE\defuser\SOFTWARE\Microsoft\Windows\CurrentVersion\Lock Screen\Creative" /V ActionUri /T REG_SZ /D "" /F & cmd.exe /c REG ADD "HKEY_LOCAL_MACHINE\defuser\SOFTWARE\Microsoft\Windows\CurrentVersion\Lock Screen\Creative" /V PlacementId /T REG_SZ /D "" /F & cmd.exe /c REG ADD "HKEY_LOCAL_MACHINE\defuser\SOFTWARE\Microsoft\Windows\CurrentVersion\Lock Screen\Creative" /V ClickthroughToken /T REG_SZ /D "" /F & cmd.exe /c REG ADD "HKEY_LOCAL_MACHINE\defuser\SOFTWARE\Microsoft\Windows\CurrentVersion\Lock Screen\Creative" /V ImpressionToken /T REG_SZ /D "" /F & cmd.exe /c REG ADD "HKEY_LOCAL_MACHINE\defuser\SOFTWARE\Microsoft\Windows\CurrentVersion\Lock Screen\Creative" /V CreativeJson /T REG_SZ /D "" /F & cmd.exe /c REG ADD "HKEY_LOCAL_MACHINE\defuser\SOFTWARE\Microsoft\Windows\CurrentVersion\Lock Screen\Creative" /V PortraitAssetPath /T REG_SZ /D "C:\Windows\Web\Screen\img100.jpg" /F & cmd.exe /c REG ADD "HKEY_LOCAL_MACHINE\defuser\SOFTWARE\Microsoft\Windows\CurrentVersion\Lock Screen\Creative" /V LandscapeAssetPath /T REG_SZ /D "C:\Windows\Web\Screen\img100.jpg" /F & cmd.exe /c REG ADD "HKEY_LOCAL_MACHINE\defuser\SOFTWARE\Microsoft\Windows\CurrentVersion\Lock Screen\Creative" /V HotspotImageFolderPath /T REG_SZ /D "C:\Windows\Web\Screen\img100.jpg" /F
    • Tweak – LockScreen SpotLight Disable
      image
      REG ADD "HKEY_LOCAL_MACHINE\defuser\SOFTWARE\Policies\Microsoft\Windows\CloudContent" /V DisableWindowsSpotlightFeatures /T REG_DWORD /D 00000001 /F
  • Tweak – Unmount ntuser.dat as defuser
    image
    reg.exe unload HKEY_LOCAL_MACHINE\defuser


Lock Down Mode (Scenario 1)

  • Tweak – Set Enforced Lock Screen Step 1 (Copy) –Same as the one used above, just different description
    image
    cmd.exe /c copy WallPapersLockScreens\lego-img1.jpg C:\Windows\Web\Screen\img100.jpg /Y & cmd.exe /c copy WallPapersLockScreens\lego-img1.jpg C:\Windows\Web\Screen\img105.jpg /Y
  • Tweak – Set Enforced Lock Screen Step 2 (Registry)
    image
    REG ADD "HKEY_LOCAL_MACHINE\SOFTWARE\Policies\Microsoft\Windows\Personalization" /V LockScreenImage /T REG_SZ /D C:\Windows\Web\Screen\img100.jpg /F

After OSD in the registry:

You can download this entire TS from my blog post about Windows 10 Customizations.

So, how does it look when after OSD completes… pretty. Smile

image

Posted originally at garytown.com - @gwblok

Customize SetupComplete.cmd and SetupRollback.cmd

$
0
0

Why?  Ever want to run a few tasks after upgrade, or more importantly, ensure a few things happen if the upgrade goes south and rollsback?  Why not hitch a ride on what ConfigMgr is doing natively and add a few things you need.

Supported?  Highly unlikely.  Please test, and please don’t say “Gary did it” as rationalization when someone asks why you decided to do this.

Do you do it?  Heck yes I do, in my lab.  Need to get a little more test results before implementing in Production

How do you use it?  I’m not telling! Oh wait, that’s why I’m blogging.  I modify the SetupRollback.cmd to ensure the machine is pulled out of provisioning mode when it the upgrade rolls back, and to set a registry key for our reporting, and trigger hardware inventory.

More background.
ConfigMgr has two files in the c:\windows\ccm folder that it uses:

  1. SetupCompleteTemplate.cmd
  2. SetupRollbackTemplate.cmd

During the IPU Task Sequence, the Run OS Upgrade Step does many many things (OSDUpgradeOS.exe), like place the machine into provisioning mode, compile the command line to be used with the Windows 10 Setup Engine, and more, including, what we’ve gather here today to talk about, creating the SetupComplete.cmd and SetupRollback.cmd files.

image

These files also live on your server, so if you want to modify the ones in your boot media for whatever reason, you’d do it here: %Program Files%\Microsoft Configuration Manager\OSD\bin\x64
image

Knowing this information, we can then create our own package with those files.
image
I’ve created a readme file with basic info (I tend to forget, which is why I blog and document).  I also created Append text files for each, which contains the additional information I’ve added to each of the two command files.  Why?  So the next time I update CM to the next Current Branch, I can grab the latest SetupCompleteTemplate.cmd and SetupRollbackTemplate.cmd  files and use those.  Perhaps the CM Team updated the scripts with some useful items.  This way, I can just delete the 2 I have, copy the new ones over, and append my additional code to them.

SetupRollbackTemplate.cmd: (Yellow is what I added)
image

Appended Information:

echo %DATE%-%TIME% Exiting setuprollback.cmd (Offical) >> %WINDIR%\setuprollback.log

REM Adding Custom Items HERE
echo %DATE%-%TIME% Starting GARYTOWN Additional Items >> %WINDIR%\setuprollback.log
echo %DATE%-%TIME% Run Command to remove from provisioning mode >> %WINDIR%\setuprollback.log
WMIC /namespace:\\root\ccm path sms_client CALL SetClientProvisioningMode "False" /NOINTERACTIVE
echo %DATE%-%TIME% Removing from provisioning mode Complete >> %WINDIR%\setuprollback.log

REM Setting WaaS Key Registry Key, requires %SMSTS_Build% variable in TS set.
echo %DATE%-%TIME% Setting WaaS_Stage RegKey to IPU_RollBack >> %WINDIR%\setuprollback.log
REG ADD "HKEY_LOCAL_MACHINE\SOFTWARE\WaaS\%SMSTS_Build%" /V WaaS_Stage /T REG_SZ /D "IPU_RollBack" /F

REM Trigger Hardware Inventory:
echo %DATE%-%TIME% Trigger Hardware Inventory >> %WINDIR%\setuprollback.log
WMIC /namespace:\\root\ccm path sms_client CALL TriggerSchedule "{00000000-0000-0000-0000-000000000001}" /NOINTERACTIVE

echo %DATE%-%TIME% Exiting setuprollback.cmd after additional custom commands >> %WINDIR%\setuprollback.log
set SCCMClientPath=

In the In Place Upgrade Task Sequence:
image

xcopy *.cmd "%WINDIR%\CCM" /Q /Y /I

I also made a minor change in the SetupComplete.cmd, just so I could confirm this was working without having to reproduce an actual rollback.
image

And as you can see, after the upgrade, the registry key is updated, the log file is also updated.
image

OR... the NO Content Version.  I actual prefer this, as you don't have to manage a package and keep it updated.
I have 2 steps in the TS, one for each .cmd file.

SetupComplete (just creating a test key, I really don't have anything I need to do with this, as anything post upgrade I do in the TS)

cmd.exe /c echo REG ADD "HKEY_LOCAL_MACHINE\SOFTWARE\WaaS\%SMSTS_Build%" /V Test_CustomBatchFile /T REG_SZ /D "SetupCompleteTemplate" /F >> %WINDIR%\CCM\SetupCompleteTemplate.cmd

SetupFallback, Update WaaS_Status Key, Pull from Provisioning Mode, Trigger HWinv

cmd.exe /c echo REG ADD "HKEY_LOCAL_MACHINE\SOFTWARE\WaaS\%SMSTS_Build%" /V WaaS_Stage /T REG_SZ /D "IPU_RollBack" /F >> %WINDIR%\CCM\SetupRollbackTemplate.cmd & cmd.exe /c echo WMIC /namespace:\\root\ccm path sms_client CALL SetClientProvisioningMode "False" /NOINTERACTIVE >> %WINDIR%\CCM\SetupRollbackTemplate.cmd & cmd.exe /c echo WMIC /namespace:\\root\ccm path sms_client CALL TriggerSchedule "{00000000-0000-0000-0000-000000000001}" /NOINTERACTIVE >> %WINDIR%\CCM\SetupRollbackTemplate.cmd

I hope you find this interesting, if not helpful.
Thanks to @MikeTerrill for showing me these files on the Server, and peeking my curiosity as I search for ways to improve the IPU process, one of which is to reduce the number of machines stuck in provisioning mode after they roll back.
Originally Posted on GARYTOWN.COM

Automatically Capture Hard Blocker

$
0
0

This was one of Keith S. Garner’s (@keithga1) gifts to me before he parted ways on his new adventure.  I asked him for a script to automatically pull the Hard Blocker from the compatdata XML file created during the Windows 10 compatibility scan.  After I gave him my request, he hit me up on skype about 2 hours later and said he didn’t write a script, he wrote me a 1 liner.  Keith knows how much I like 1 liners.  Why?  Task Sequences!  If I don’t have to have content to accomplish a step, all the better!  I've been known to build scripts on the fly using echo >> script.bat then running the script.bat file just so I don't have to have content.

So what’s this magic 1 line of code?  I'm getting to that.

I’ve modified it slightly, one example writes it directly to the Registry, and one that writes it to a TS Variable, and you can then do what you want with it.  I’ve added that TS Variable to be written to WMI & the Registry in my modified “SetOSDInfo” Script that I recently blogged.  I’ve updated that script as well to include this.

Registry Key:  (modify the Registry Path for your own needs)

powershell.exe -command "get-childitem 'C:\$WINDOWS.~BT\Sources\Panther\compat*.xml' | Select-object -last 1 | ? { [datetime]::ParseExact($_.Name.SubString(11,19),'yyyy_MM_dd_HH_mm_ss',$null) -gt [datetime]::now.AddDays(-1) } | % { (type $_.FUllName) -as [xml] } | % CompatReport | % Programs | % Program | ? { $_.CompatibilityInfo.BlockingType -eq 'Hard' } | % name | %{ Set-itemproperty 'HKLM:\SOFTWARE\WaaS\%SMSTS_BUILD%' 'CompatScanHardBlock' $_ }"

image

OSD Variable

powershell.exe -command "get-childitem 'C:\$WINDOWS.~BT\Sources\Panther\compat*.xml' | Select-object -last 1 | ? { [datetime]::ParseExact($_.Name.SubString(11,19),'yyyy_MM_dd_HH_mm_ss',$null) -gt [datetime]::now.AddDays(-1) } | % { (type $_.FUllName) -as [xml] } | % CompatReport | % Programs | % Program | ? { $_.CompatibilityInfo.BlockingType -eq 'Hard' } | % name | %{$tsenv = New-Object -COMObject Microsoft.SMS.TSEnvironment; $tsenv.Value('SMSTS_HardBlocker') = $_ }"

image

Have the  Step set to run if TS Variable _SMSTSOSUpgradeActionReturnCode = 3247440392

Here is what my registry looks like after running the CompatScan TS with both Examples.
image

From a Dump of the TS Variables (using @CCMExec’s Safe Dump)
image

At this point, you’d then collect it with your hardware inventory and add it to your reports.

Update CCMCache Size via PowerShell

$
0
0

Super short post, just more for self-documenting.

I found tons of scripts out there to do this, but they all required having to reset ccmexec before the cache size updates.  So… if you do it from the control panel, you don’t have to reset the service…  what were those scripts doing wrong, that the control panel was doing right?  Mike Terrill told me… the Control Panel uses the COM object, so lets just do that with Powershell!

Super Simple (1 Line!)
Sure you can break it out into more lines if you’re going to make a script to make it more “read-able”, but I like 1 liners.

in PowerShell:
New-Object -ComObject UIResource.UIResourceMgr).GetCacheInfo().Totalsize = "25000"

In Task Sequence Run Command Line Step:

powershell.exe -command "New-Object -ComObject UIResource.UIResourceMgr).GetCacheInfo().Totalsize = ""25000"""

Originally Posted on GARYTOWN.COM

WaaS–Post 2–In Place Upgrade TS

$
0
0

WARNING... WORK IN PROGRESS...  This has been in my drafts for a couple months, I'm pretty busy so I don't know when I'll get to polish it, so for now, just publishing it with intent to go back and update it.  Since I wrote this, there has been several changes already, due to advances in CM, finding bugs, etc.  Anyway, because this is really never going to be 100% done, just going to click publish now, so you can start playing with it...
PS.. Mike Terrill is working on a very detailed blog post that will hopefully answer many of your questions as well, but he is waiting for making his more polished, he takes more pride in his blog posts than I do. 🙂

Download the Task Sequences and Content ---> HERE <---  I will try to keep that updated as I update my Lab's TS

Ok, so about a couple weeks ago, I posted the Pre-Cache Compat Scan Task Sequence, in Part 1, now it’s time to go over the IPU.  It’s taken a couple weeks as I keep updating, refining, and finally came to the realization, I could keep tweaking this forever and never get around to posting.  So, I figured, I should just post this, even if it’s not 100% complete.  Just this should be pretty helpful to many.


Recommendations. Use Reg2Mof - While I write much of the data to WMI, throughout the TS, I update registry keys with useful information (WaaS_Stage as example), which I’m not writing to WMI until the end of the TS.  At work, we do not use any of the WMI options like I do in my lab, we only write this information to the Registry, then use Reg2Mof to pull these keys in.  After we make changes to the Registry during the TS, we trigger a Hardware Inventory, that way reports are updated fairly quickly.  Also several useful values are written using the PreFlight Script (by @Keithga1) which are not written to WMI, so you’d miss all that great data… long story short, if you want to add all this useful data into your CM’s Database for Metrics / Reporting, use Reg2Mof. (Example of Registry keys being updated then hardware inventory being triggered)

image


So here is the TS (work in progress).  I’ve flattened most of it into 1 TS, instead of having several Sub-TS’s mostly for simplicity of blogging and exporting.

image
image


There is just so many steps to go into, so I’m not going to go into all of them.  I’ll give brief overviews of sections, and more detail on what I’d consider important.  If you download and Import the TS into your lab, I’ve tried to document most of the steps themselves in the comments sections.

TS Prep:  Sets variables used later on, then a folder for Running the majority of the TS, but only if it’s not already on SMSTS_Build (1803 in this example) – we did create a way to bypass this if we wanted the upgrade to run again on a machine already on the current build using a collection variable (SMSTS_Build_Bypass).
If  the OS is already on the upgraded version, it skips to the end and sets the Registry to Success for the reports, then updates inventory.
image

Next we run the PreFlight, ideally we wanted to run this outside of the Task Sequence, as these are not true task sequences failures.  These are things that we want to check to prevent the TS from running, as we have a good idea it will prevent the TS from running successfully.  Hopefully Keith blogs the PreFlight Script, as I can’t do it justice.  It is in the export that I’ve uploaded and you can take or leave what you want.  We run the PreFlight in two different modes, if someone is logged on, it created self-closing popup dialog boxes for the user to interact with, so they can plug in their device, or connect to vpn.  If no one is logged on, it just records the information to the registry and continues without creating a popup box

image

If PreFlight Fails, it drops out of it’s Group, skips the Main TS Group, and sets the Return Code to be used in the “PHail if not 1803” step.

If the PreFlight Steps fails in a “good” way, where it writes information to the registry, it will grab that and use for the return code.  If PreFlight fails in a bad way, and doesn’t write any useful info to the registry, it will set ReturnErrorCode to "143".

After PreFlight, we move into the Main TS, where we set some additional variables, change power settings, update the lockscreen image and legal text and download the drivers again, but not really download, they should already be there from the CompatScan / PreCache TS.  However, we need to run the steps again so that it creates the DRIVER01 variable used for the TS to know where the drivers are in the Cache, and which OS Upgrade Step to use (Drivers or no drivers).  It should run these steps very quickly, as it will see that the content is already there.

In my lab example, I also set the user’s desktop background to something custom during the upgrade using BGInfo, it’s probably a bit much, but I added it in to this because, well, just because. I’ve also added the Deny Logon Section, but disabled it.
I also have a few “failsafe” steps to help remove the machine from Provisioning mode if a rollback should occur.  I have a step that creates a Scheduled task, that runs when someone logs in, that will create a run-once key to remove a computer from provisioning mode.  This way, if a machine rolls back, and is in provisioning mode, when a user logs in, it will trigger the scheduled task to create the one once key, so the next time they log on, it will actually remove it from provisioning mode.  Why not just remove it on the next user logon?  Well, what if someone ignores the warning and logs on during the upgrade?  I really don’t want it to get pulled out of provisioning mode then, but at that point, it would create the run once key for when someone logs in after the upgrade.

image

Alright, so all of that is leading up to the actual upgrade OS steps.
First adding Variables, one to grab the time before we start the upgrade, and one to add additional parameters for the upgrade.

image

We then have two groups, one for Upgrades with without Drivers, and one with Drivers.  This is where the DRIVERS01 variable comes into play.
No Drivers Group: image

Drivers Group: image

We then finish off with grabbing the time again and setting a variable to the finished time.  Then setting a return code to use at the end of the TS, based on the Setup Engine.

After the Setup is done, we move on to the Post-Processing section, Here we call another TS to apply all of the customizations again.
Then onto some cleanup, make sure all of the lock screens, and other scheduled tasks we used are gone, since at this point, if the ts made it this far, we wouldn’t need those safe guards.

Then we grab more info, and and write it to the registry and WMI (SetOSDInfo PS Step).

It will then go through, check if the current OS is the desired OS, if not, Copy Logs to Server, and fail the Task Sequence using the ReturnErrorCode that we’ve set along the way.

Otherwise it continues to the end running the 4 last steps that are redundant at this point, but were there as explained earlier if the machine was already upgraded.


So, I didn’t go into a ton of Detail, and hope the TS itself will provide that detail.  If you’ve imported the TS, and some things still don’t make sense, let me know and I’ll go into more detail here.  But for the sake of time, and to get this posted… this is what you get. Smile


Download HERE

So when it’s all done, and successfully upgrade, if you’ve followed our Process (PreCache / CompatScan TS, PreFlight, IPU), your registry will look like this:
image

You then inventory that, and make pretty reports.
Originally Posted on GARYTOWN.COM


Tweet from PowerShell... Customized for a TS

$
0
0

Ok.. another one that's been in my drafts for the past 3 months, Seems to work fine, however if you run it in a TS over and over and over again because you're testing constantly, it seems to skip some, like Twitter blocks duplicate Tweets. Anyway, here ya go.  If you have any improvements, please get ahold of me.

-----

Hey Folks, so I am at MMS right now, and I saw a lot of demos were people were tweeting from at Task Sequence using Orchestrator. I was like, um.. that seems like a lot of work to just tweet, I don't want to support another server, hopefully it's actually doing more than just tweeting. I set this up a while back for fun, and forgot to blog it, so here it goes. The hardest part... was already done by Adam! I stole his work, and built on top of it. You've probably noticed that is a theme on my blog, I like to borrow the hard work of other and twist it for my own purposes, of course giving credit where credit is due. I hope you are doing the same to my blog, and please give me a shout out if you take something I've done and add to it, and then blog it for everyone else to use!
So I started here, Adam's  Blog.  This provided the connections to Twitter.  I created a new account specifically for my blog (@garytownblog) and set it up in his script, which he explains in great detail.  So Part 1 ... Go there and do that..

Part 2... the half that makes it work nicely in a Task  Sequence.

#Used this Blog Post to get PS Tweet Module: https://www.adamtheautomator.com/twitter-module-powershell/
# - Create the .MyTwitter.psm1 based on that blog poast and place the file in same folder as this Script to run in your TS
#CMTraceLogging from Ryan  Ephgrave: https://www.ephingadmin.com/powershell-cmtrace-log-function/
#This Script just imports that module, then grabs basic info to Tweet
#Used at the end of TS to Tweet completion. 
#@gwblok - https://garytown.com
#usage: TSSendTweet.ps1 -Users'@gwblok, @garytownblog' -HashTags '#ThisRocks'
#usage: TSSendTweet.ps1 -TestMode   (This will spit out diagnostic info only to Twitter (Computer Name, IPU or OSD, Model, RunTime, Addtional CommandLine)

[CmdletBinding()]
Param(
    [Parameter(Mandatory=$false,Position=1,HelpMessage="Users")]
    [ValidateNotNullOrEmpty()]
    [string]$Users,

    [Parameter(Mandatory=$false,Position=1,HelpMessage="HashTags")]
    [ValidateNotNullOrEmpty()]
    [string]$HashTags,

    [Parameter(Mandatory=$false,Position=1,HelpMessage="Tweet Message Content")]
    [ValidateNotNullOrEmpty()]
    [string]$TweetContent
    ,

    [Parameter(Mandatory=$false,Position=1,HelpMessage="Tweet Message Content")]
    [ValidateNotNullOrEmpty()]
    [ValidateSet("Yes","No")]
    [string]$TestMode 

)

Import-Module .\MyTwitter.psm1

#Connect to Task Sequence Environment
$tsenv = New-Object -COMObject Microsoft.SMS.TSEnvironment
$SetOSDInfoType = $tsenv.Value("SetOSDInfoType")
$TSname = $tsenv.Value("_SMSTSPackageName") 
$OSBuild = $tsenv.Value("SMSTS_BUILD") 
$LogFilePath = $tsenv.Value("_SMSTSLogPath")
$LogFile = "$LogFilePath\TSTweet.log"
$model = (Get-CimInstance -ClassName Win32_ComputerSystem).Model
$OSDSetupAdditionalUpgradeOptions = $tsenv.Value("OSDSetupAdditionalUpgradeOptions")
if ($OSDSetupAdditionalUpgradeOptions -ne "$null")
    {
    $SetupArguments = "with Arguments $OSDSetupAdditionalUpgradeOptions"
    }
else
    {
    $SetupArguments = "with Default  Arguments"
    }    

function LogCMTrace {
    Param (
		[Parameter(Mandatory=$false)]
		$Message,
 
		[Parameter(Mandatory=$false)]
		$ErrorMessage,
 
		[Parameter(Mandatory=$false)]
		$Component,
 
		[Parameter(Mandatory=$false)]
		[int]$Type,
		
		[Parameter(Mandatory=$true)]
		$LogFile
	)
<#
Type: 1 = Normal, 2 = Warning (yellow), 3 = Error (red)
#>
	$Time = Get-Date -Format "HH:mm:ss.ffffff"
	$Date = Get-Date -Format "MM-dd-yyyy"
 
	if ($ErrorMessage -ne $null) {$Type = 3}
	if ($Component -eq $null) {$Component = " "}
	if ($Type -eq $null) {$Type = 1}
 
	$LogMessage = "<![LOG[$Message $ErrorMessage" + "]LOG]!><time=`"$Time`" date=`"$Date`" component=`"$Component`" context=`"`" type=`"$Type`" thread=`"`" file=`"`">"
	$LogMessage | Out-File -Append -Encoding UTF8 -FilePath $LogFile
}

LogCMTrace -Message "TSTweet Process Started in $SetOSDInfoType Mode" -Type 1 -LogFile $LogFile
LogCMTrace -Message "TSTweet Process Started in TestMode: $TestMode" -Type 1 -LogFile $LogFile

if ($TestMode -eq "Yes")
    {
    $DifferenceUpgrade = ([datetime]$TSEnv.Value('SMSTS_FinishUpgradeTime')) - ([datetime]$TSEnv.Value('SMSTS_StartUpgradeTime')) 
    $DifferenceUpgrade = [math]::Round($DifferenceUpgrade.TotalMinutes)
   
    LogCMTrace -Message "Deployed $OSBuild $SetOSDInfoType $SetupArguments on $env:computername Model: $model - Setup Time: $DifferenceUpgrade" -Type 1 -LogFile $LogFile
    Send-Tweet -Message "Deployed $OSBuild $SetOSDInfoType $SetupArguments on $env:computername Model: $model - Setup Time: $DifferenceUpgrade"
    }

else
    {
    if ($TweetContent -ne "$null")
        {    
        LogCMTrace -Message "Message specified, using user's message" -Type 1 -LogFile $LogFile
        LogCMTrace -Message "TSTweet - $Users, $TweetContent $HashTags" -Type 1 -LogFile $LogFile
        Send-Tweet -Message "$Users, $TweetContent $HashTags"
        }

    else
        {
        LogCMTrace -Message "Null Message, using Script to determine message" -Type 1 -LogFile $LogFile
            if ($SetOSDInfoType -eq 'IPU' -or $SetOSDInfoType -eq 'CS')
                    {
        
                    [int64] $decimalreturncode = $tsenv.Value("_SMSTSOSUpgradeActionReturnCode")
                    #[int64] $hexreturncode = 0xC1900210
                    $hexreturncode = "{0:X0}" -f [int64]$decimalreturncode

                            $WinIPURet = @(
                        @{ Err = "C1900210"; Msg = 'No compatibility issues.'}
                        @{ Err = "C1900208"; Msg = 'Incompatible apps or drivers.' }
                        @{ Err = "C1900204"; Msg = 'Selected migration choice is not available.' }
                        @{ Err = "C1900200"; Msg = 'Not eligible for Windows 10.' }
                        @{ Err = "C190020E"; Msg = 'Not enough free disk space.' }
                        @{ Err = "C1900107"; Msg = 'Unsupported Operating System.' }
                        @{ Err = "0"; Msg = 'Windows Setup completed successfully.' }
                        )
                    $ErrorMsg = $winipuret | ? err -eq $hexreturncode  | % Msg
                    if ($ErrorMsg -ne  $null)
                        {
                        LogCMTrace -Message "TSTweet - Hey $Users, Deployed Windows 10 $OSBuild on $env:computername is complete with result: $ErrorMsg $HashTags" -Type 1 -LogFile $LogFile
                        Send-Tweet -Message "Hey $Users, Deploy Windows 10 $OSBuild on $env:computername is complete with result: $ErrorMsg  $HashTags"
                        }
                    else
                        {
                        LogCMTrace -Message "TSTweet - Hey $Users, $TSname deploying Windows 10 $OSBuild on $env:computername is complete.  $HashTags" -Type 1 -LogFile $LogFile
                        Send-Tweet -Message "Hey $Users, $TSname deploying Windows 10 $OSBuild on $env:computername is complete.  $HashTags"
                        }
            }
            if  ($SetOSDInfoType -eq 'OSD')
                {
                LogCMTrace -Message "TSTweet - Hey $Users, $TSname deploying Windows 10 $OSBuild on $env:computername is complete.  $HashTags" -Type 1 -LogFile $LogFile
                Send-Tweet -Message "Hey $Users, $TSname deploying Windows 10 $OSBuild on $env:computername is complete. $HashTags"
                }
        }

    }

It requires several variables, but if you use my  Task  Sequence that you can download from HERE, (MMS2018) then you can just plop it in.
Otherwise, you'll need to make sure your TS has  (talked about more here)

"SetOSDInfoOType", (Either IPU or  CS or  OSD)
"osbuildversion", which will be the build number you set in your  TS.  It uses these to create a hand crafted tweet with additional info.  You can always remove these and have a generic tweet message for each time you run it, or add to it.   Pretty flexible.

Once you have your script, and you add it to your content, you can then add it to your  TS.
Run  PowerShell Script Step -> point at your script, add users you want to tag  (If you want to), and you're set.


IPU & Offline Dynamic Updates

$
0
0

UPDATE: 8/20 - Adam Gross (@AdamGrossTX) added more info and explain even more!  That guys is awesome, really nice walk through on how to do it with a script to automate!  Check it out HERE

UPDATE: 8/17 - Heard back from MS.  Rest of those Dynamic Updates need to be applied offline to your Build Media, they are NOT included in the monthly CU. (Read full article for context)

Dynamic updates, what are those things?  Well, as Microsoft says “With Dynamic Update, if you start a computer from an existing operating system (for example, Windows 8), and then run Setup from that operating system [IN PLACE UPGRADE], Setup [Windows 10 Upgrade Setup] can check for new Setup files, including drivers and other files.”  You can enable it in your TS on the Upgrade OS step: (yes, you want to do this if you have bandwidth, way more info HERE, Thanks Adam)
image

As explained in that article, many organizations disables dynamic updates so it doesn’t go out to the internet to get that data, and even prevent it from pulling down from WSUS.  Why block this, bandwidth.  If you have several computers on a small WAN link all trying to go out to Windows Update or even a remote SUP to pull down this content, it could bring down that remote office.

But that information in the dynamic update is very valuable, and can improve success rates for Windows 10 upgrades, so how can we incorporate the dynamic update content directly to the windows upgrade media source package?  Pretty easy actually…  download the KB, extract it, and copy it into your package.

Here’s how I was able to find the Dynamic Update KB (If anyone knows a better way, please let me know).
Look through your Software Updates in CM Console.

image

So you don’t see Dynamic Updates when you search?  Make sure you enabled that product in “Software Update Point Component Properties”
image

Ok, so now that you know how to find it, grab the download URL from the properties & Download.
Once downloaded, go ahead and extract it to a temp location.
expand KB123456.cab f:* C:\Temp\KB123456
image

You’ll now see the extracted Files:
image

If you take a look at it, you can see that the version is updated to a much higher level than the original.  devinv.dll, look familiar?  It should.. if you don’t update this, if you’re doing upgrades to 1709, it’s probably caused you trouble.  Detailed info from CTGlobal’s Blog

So now, you just copy those files to your Windows Upgrade Media Package into the sources folder and update (overwrite) the original files.  (really recommend you do this in your Pilot Package first, then once tested, apply the changes to your Prod Package)

image

Congratulations, now you’ve got the Dynamic Update goodness built into your Windows Update Media.

Sorry, I have no automation to do this monthly, it’s a bit of leg work, but worth it. (or just check that box in your TS if you can without melting your network)

If you’re like me, you’re wondering, what about all those other dynamic updates, they aren’t superseded, so what are they?  I went ahead and extracted them all, they contained drivers, manifests and many other random files.  I did not add them into my sources folder, as it felt to me like they belonged in various sub-folders, but when I extracted them, they didn’t extract in a way I’d feel comfortable with just adding into my sources folder.  I’ve got a dialog open with MS about it, and I’m hoping they explain how I can incorporate those other ones as well.  I’ll update this post once I know more... Updated...

UPDATE: 8/17 - Heard back from MS.  Rest of those Dynamic Updates need to be applied offline to your Build Media, they are NOT included in the monthly CU.

Posted on GARYTOWN.COM

Setup Alias for your ConfigMgr Content Source

$
0
0

Super quick post, basically I had to do this today and I don’t want to forget when I replace my source file server next time.

What:  Setting up Alias name for CM Source File Server, so when the server is replaced, you move the Alias name to the new server, so it never impacts your Package Content Source Path.image

How: NetDom – TechNet Blog HERE
image

Right about now you might be saying “Ok Gary, this is great, but I didn’t plan ahead, should I wait to when I replace the server to set this up, or just do it now?”  I say,  “DO IT NOW!”..  All future content you can use the Alias name, and as you get time, you can prune old garbage and update rest of the package properties to the alias path.

To make that process a bit easier, @NickolajA created this nifty tool to migrate your paths via automation.  TechNet Gallery

Posted on GARYTOWN.COM

Scripts Node, Add Local & Network Logging to Script

$
0
0

This is basically two posts in one, add logging to your scripts in the script node, and Get Service Windows Info, check if you have any deployments being squashed by too restrictive Services Windows, and remove the service windows if you want to.  Why add logging… several reasons, to know what the script did, to have a “paper trail”, and helps with troubleshooting.  I’ve added logging to my scripts for accountability as well.  I have it log to a network share because I’m not local admin on the boxes I’m running the scripts on, so having a central share to collect the scripts is very important to me when I’m troubleshooting issues.

The reason I wrote this script was because we've run into machines that would never run the Upgrade because they would return with a status message "deployment will never run, too restrictive of service window".  We do not check the box on our deployments to run outside of a Service Window, as we want to respect what the Business Unit have said are their approved times to service machines.  However there are times when the windows are just too small for the time we've specified in our TS, or someone created a local service window manually, using a tool like Client Center, to accomplish a one-off task and never cleaned it up.  So I created a script that would read the execmgr.log file, search for a restrictive window issue, then delete them (based on parameters).  You can search for Local Service Windows or Server Side (Collection) Service Window and delete those, or choose Delete all service windows.  Common Sense Warning:  Use with Caution, and Test please.  This script is deleting Service Windows which restrict installs / reboots from happening all willy nilly.  If you start removing those restrictions… well.. you get it.

imageThe Script in action on local machine:

image

Running Script from ScriptNode.  Shows the Parameters I chose, and the Status on Machines
image
image

The Script in action, showing log on Server
image

It also logs locally

image

If you run the script via ISE, it will Log locally, but not on the server, and it will show all of same info in ISE (Write-Host)
All logging & Write Host is being done via the Function CMTraceLog, borrowed from @EphingPosh HERE

This Script has several parameters, giving you a lot of flexibility, Disable or Enable Logging, Delete different Windows, or Delete only if it found error.  In this case, the “Error” means “The program may never run because of Service Window restrictions.”  I'll see if I can post a picture with a demo of a machine that has this "error".

Based on that, it will report back all of the Service Windows, and delete them based on the parameters being set.

To have it delete any Service Windows you have to change a Parameter from False to True:

  • DeleteEverything (Deletes every service window if finds) – Think before you do this, but thought I’d add the option.  This could be a resume generating event if you did this to like all workstations, and they had a deployment for updates that were no longer restricted by Service Windows and all started running in the middle of the day are rebooting machines…
  • DeleteLocalWindows (Deletes only Local Windows Type 1-5) – Type KEY HERE – This was really the main one that I cared about, because most of the time the Service Window causing the issue was a local Windows created manually. 
  • DeleteServerWindows (Deletes non-local Service Windows, created by your CM Servers).  I’d ASSUME the Windows would come back after machine policy refresh, but have yet to confirm, use with caution, also potential for resume generating event.
  • DeleteOnlyIfErrorFound. (must be used in conjunction with the other 3.  If you Set this to False, and another Delete Parameter to True, it will Delete the Service Windows even if there was no “Error” found.  I added this as I wanted to push it to “ a lot” of computers but only delete the Local Service Windows if the machine was reporting back that the service windows were too restrictive.  This was my safeguard to not just delete service windows on every machine I ran the script on.
  • ScriptLogging.  This is to enable or disable logging for the script.  Disables both Server & local side logging.

Script:

<#GARYTOWN.COM 
Twitter: @gwblok
Get Service Windows Info, Delete if you like
2018.09.02

This Script will Return all Service Windows, Allow you to specifiy if you want to delete 
Local or Remote, as well as let you know if there are any mentions in the execmgr log that 
service windows are too restrictive to run a deployment.

Logs locally (ccm\logs\scriptsnode.log and on Server if you set ScriptLogging to True (Which is the Default)

#>

[CmdletBinding()]
Param (
    #Logs to Network (Make sure you update the Server Share info)
    [Parameter(Mandatory=$false)][ValidateSet("True","False")][string] $ScriptLogging = "True",
    #Delete SWs that are Local, Type 1-5 (not 6)
    [Parameter(Mandatory=$false)][ValidateSet("True","False")][string] $DeleteLocalWindows = "False",
    #Delete SWs that are Collection (Server) Created
    [Parameter(Mandatory=$false)][ValidateSet("True","False")][string] $DeleteServerWindows = "False",
    #Deletes them all, big hammer approach, get windows and delete ALL
    [Parameter(Mandatory=$false)][ValidateSet("True","False")][string] $DeleteEverything = "False",
    #Deletes the Windows ONLY if an Error was found
    [Parameter(Mandatory=$false)][ValidateSet("True","False")][string] $DeleteOnlyIfErrorFound = "True"
      )


#region: CMTraceLog Function formats logging in CMTrace style (If Running as System, write to Network Share)
if ([System.Security.Principal.WindowsIdentity]::GetCurrent().Name -eq "NT AUTHORITY\SYSTEM"){$RunningAsSystem = "True"}


#If Parameter for Logging Enabled, setup variables for where to log to
if ($ScriptLogging -eq "True")
    {
    $TargetRootLocal = 'C:\windows\ccm\logs'
    $LocalLogFile = "$TargetRootLocal\ScriptsNode.log"
    $TargetRoot = '\\src\src$\Logs'
    $LogID = "ScriptsNodeLogs\GeneralScripts\$env:ComputerName"
    $ServerLogFile = "$TargetRoot\$LogID\ScriptsNode-$env:ComputerName.log"
    }

#If Logging enabled & script running in System Context, make sure Log folder on Server is there, or make it.
if ($RunningAsSystem -eq "True" -and $ScriptLogging -eq "True")
    {
    write-verbose "Create Target $TargetRoot\$LogID"
    new-item -itemtype Directory -Path $TargetRoot\$LogID -force -erroraction SilentlyContinue | out-null 
    }

#region: CMTraceLog Function formats logging in CMTrace style (but to Server) 
#CMTraceLog Function stolen from @EphingPosh https://www.ephingadmin.com/powershell-cmtrace-log-function/
   function CMTraceLog {
         [CmdletBinding()]
    Param (
		    [Parameter(Mandatory=$false)]
		    $Message,
 
		    [Parameter(Mandatory=$false)]
		    $ErrorMessage,
 
		    [Parameter(Mandatory=$false)]
		    $Component = $env:computername,
 
		    [Parameter(Mandatory=$false)]
		    [int]$Type,
		
		    [Parameter(Mandatory=$true)]
		    $ServerLogFile

            #[Parameter(Mandatory=$true)]
		    #$LocalLogFile
	    )
    <#
    Type: 1 = Normal, 2 = Warning (yellow), 3 = Error (red)
    #>
	    $Time = Get-Date -Format "HH:mm:ss.ffffff"
	    $Date = Get-Date -Format "MM-dd-yyyy"
 
	    if ($ErrorMessage -ne $null) {$Type = 3}
	    if ($Component -eq $null) {$Component = " "}
	    if ($Type -eq $null) {$Type = 1}
 
	    $LogMessage = "<![LOG[$Message $ErrorMessage" + "]LOG]!><time=`"$Time`" date=`"$Date`" component=`"$Component`" context=`"`" type=`"$Type`" thread=`"`" file=`"`">"
        Write-Host "$Message $ErrorMessage"
        if ($RunningAsSystem -eq "True" -and $ScriptLogging -eq "True"){$LogMessage | Out-File -Append -Encoding UTF8 -FilePath $ServerLogFile}
        if ($ScriptLogging -eq "True"){$LogMessage | Out-File -Append -Encoding UTF8 -FilePath $LocalLogFile}
         
    }


function FindServiceWindowRestrictions
{
    #Check execmgr.log file for the string about Service Window Restrictions.  
    
    $errorTable = @(
    [pscustomobject]@{ Name = 'Service Window restrictions'; File = 'c:\windows\ccm\Logs\execmgr*.log'; Search = 'The program may never run because of Service Window restrictions.' }
    )

    foreach ( $ErrorItem in $ErrorTable ) {

        if ($ScriptLogging -eq "True"){CMTraceLog -Message  "Check for $($ErrorItem.Name)" -Type 1 -ServerLogFile $ServerLogFile}
        if ( test-path $errorItem.File ) { 
            if ($ScriptLogging -eq "True"){CMTraceLog -Message  "Check for $($errorItem.File)" -Type 1 -ServerLogFile $ServerLogFile}
            type $errorItem.File |
                Select-String -Pattern $ErrorItem.Search |
                % { Write-Warning "[$env:ComputerName] Found Error $($ErrorItem.Name) : [$_]" }
            type $errorItem.File |
                Select-String -Pattern $ErrorItem.Search |
                % { if ($ScriptLogging -eq "True"){CMTraceLog -Message  "Found Error $($ErrorItem.Name) : [$_]" -Type 2 -ServerLogFile $ServerLogFile} }
            type $errorItem.File |
                Select-String -Pattern $ErrorItem.Search |
                % { $global:ErrorFound="True" }

        }

    }
}    


if ($ScriptLogging -eq "True"){CMTraceLog -Message  "----------Starting Delete Local Service Windows Script on: $env:computername----------" -Type 1 -ServerLogFile $ServerLogFile}

$OutputText = "Script was run in modes: `n     Logging: $ScriptLogging `n     Reporting Windows: $ReportWindows `n     Delete Local Windows: $DeleteLocalWindows `n     Delete Collection Windows: $DeleteServerWindows `n     Delete All SWs: $DeleteEverything `n     Delete Only if Error Fund: $DeleteOnlyIfErrorFound"
if ($RunningAsSystem -eq "True" -and $ScriptLogging -eq "True"){CMTraceLog -Message  $OutputText -Type 1 -ServerLogFile $ServerLogFile}

FindServiceWindowRestrictions

$LocalServiceWindows = Get-WMIObject -Namespace 'ROOT\ccm\Policy\Machine\RequestedConfig' -Query 'SELECT * FROM CCM_ServiceWindow WHERE PolicySource = "Local" '
foreach ($LocalSW in $LocalServiceWindows)
    {      
    $LocalServiceWindowID = ("ID: " + ($LocalSW).ServiceWindowID + "  Type: " + ($LocalSW).ServiceWindowType)
    $OutputText = "Machine has Local Service Windows: $LocalServiceWindowID"
    if ($ScriptLogging -eq "True"){CMTraceLog -Message  $OutputText -Type 1 -ServerLogFile $ServerLogFile}    
    }    
$ServerServiceWindows = Get-WMIObject -Namespace 'ROOT\ccm\Policy\Machine\RequestedConfig' -Query 'SELECT * FROM CCM_ServiceWindow WHERE (ServiceWindowType = "1") or (ServiceWindowType = "5") AND PolicySource <> "Local" '
foreach ($ServerSW in $ServerServiceWindows)
    {
    $ServerServiceWindowsID = ("ID: " + ($ServerSW).ServiceWindowID + "  Type: " + ($ServerSW).ServiceWindowType)
    $OutputText = "Machine has Server Service Windows: $ServerServiceWindowsID"
    if ($ScriptLogging -eq "True"){CMTraceLog -Message  $OutputText -Type 1 -ServerLogFile $ServerLogFile}    
        }        
    if ($ErrorFound -eq "True")
    {
    $OutputText= "Machine has too restrictive of MWs to run Deployments (According to current execmgr logs)"
    if ($ScriptLogging -eq "True"){CMTraceLog -Message  $OutputText -Type 2 -ServerLogFile $ServerLogFile}    
    }
Else
    {
    $OutputText = "Machine has no SWs that are too restrictive (According to current execmgr logs)"
    
    if ($ScriptLogging -eq "True"){CMTraceLog -Message  $OutputText -Type 1 -ServerLogFile $ServerLogFile}    
    }       


if ($ErrorFound -eq "True" -and $DeleteOnlyIfErrorFound -eq "True")
    {
    $OutputText = "Machine has too restrictive of MWs, Moving ahead with Delete Section of Script"
    if ($ScriptLogging -eq "True"){CMTraceLog -Message  $OutputText -Type 1 -ServerLogFile $ServerLogFile}    
    
    if ($DeleteLocalWindows -eq "True")
        {
        $LocalServiceWindows = Get-WMIObject -Namespace 'ROOT\ccm\Policy\Machine\RequestedConfig' -Query 'SELECT * FROM CCM_ServiceWindow WHERE (ServiceWindowType = "1") or (ServiceWindowType = "2") or (ServiceWindowType = "3") or (ServiceWindowType = "4") or (ServiceWindowType = "5") AND PolicySource = "Local" '
        if ($LocalServiceWindows -ne $Null)
            {
            foreach ($LocalSW in $LocalServiceWindows)
                {
                    $LocalServiceWindowID = ("ID: " + ($LocalSW).ServiceWindowID + "  Type: " + ($LocalSW).ServiceWindowType)
                    $OutputText = "Machine has Local Service Windows: $LocalServiceWindowID"
                    if ($ScriptLogging -eq "True"){CMTraceLog -Message $OutputText -Type 1 -ServerLogFile $ServerLogFile}    
                }
            $LocalServiceWindows | Remove-WmiObject
            #Confirm They are Gone
            $LocalServiceWindows = Get-WMIObject -Namespace 'ROOT\ccm\Policy\Machine\RequestedConfig' -Query 'SELECT * FROM CCM_ServiceWindow WHERE (ServiceWindowType = "1") or (ServiceWindowType = "2") or (ServiceWindowType = "3") or (ServiceWindowType = "4") or (ServiceWindowType = "5") AND PolicySource = "Local" '
            if ($LocalServiceWindows -eq $Null)
                {
                $OutputText = "Confirmed all Local Services Windows are Gone"
                if ($ScriptLogging -eq "True"){CMTraceLog -Message $OutputText -Type 1 -ServerLogFile $ServerLogFile} 
                }
            }
        }

    if ($DeleteServerWindows -eq "True")
        {
        $ServerServiceWindows = Get-WMIObject -Namespace 'ROOT\ccm\Policy\Machine\RequestedConfig' -Query 'SELECT * FROM CCM_ServiceWindow WHERE (ServiceWindowType = "1") or (ServiceWindowType = "5") AND PolicySource <> "Local" '
        if ($ServerServiceWindows -ne $Null)
            {
                foreach ($ServerSW in $ServerServiceWindows)
                {
                $ServerServiceWindowsID = ("ID: " + ($ServerSW).ServiceWindowID + "  Type: " + ($ServerSW).ServiceWindowType)
                $OutputText = "Machine has Server Service Windows: $ServerServiceWindowsID"
                if ($ScriptLogging -eq "True"){CMTraceLog -Message  $OutputText -Type 1 -ServerLogFile $ServerLogFile}  
                }
            $ServerServiceWindows | Remove-WmiObject    
            #Confirm They are Gone
            $ServerServiceWindows = Get-WMIObject -Namespace 'ROOT\ccm\Policy\Machine\RequestedConfig' -Query 'SELECT * FROM CCM_ServiceWindow WHERE (ServiceWindowType = "1") or (ServiceWindowType = "5") AND PolicySource <> "Local" '
            if ($ServerServiceWindows -eq $Null)
                {
                $OutputText = "Confirmed all Local Services Windows are Gone" 
                if ($ScriptLogging -eq "True"){CMTraceLog -Message  $OutputText -Type 1 -ServerLogFile $ServerLogFile} 
                }
    
            }
        }


    if ($DeleteEverything -eq "True")
        {
        $AllServiceWindows = Get-WMIObject -Namespace 'ROOT\ccm\Policy\Machine\RequestedConfig' -Query 'SELECT * FROM CCM_ServiceWindow'
        if ($AllServiceWindows  -ne $Null)
            {
            foreach ($AllSW in $AllServiceWindows)
                {
                $AllServiceWindowsID = ("ID: " + ($AllServiceWindows).ServiceWindowID + "  Type: " + ($AllServiceWindows).ServiceWindowType)
                $OutputText = "Machine has Local & Server Service Windows: $ServerServiceWindowsID"
                if ($ScriptLogging -eq "True"){CMTraceLog -Message  $OutputText -Type 1 -ServerLogFile $ServerLogFile}  
                }
            $AllServiceWindows | Remove-WmiObject
            #Confirm They are Gone
            $AllServiceWindows = Get-WMIObject -Namespace 'ROOT\ccm\Policy\Machine\RequestedConfig' -Query 'SELECT * FROM CCM_ServiceWindow'
            if ($AllServiceWindows -eq $Null)
                {
                $OutputText = "Confirmed all Local Services Windows are Gone"
                if ($ScriptLogging -eq "True"){CMTraceLog -Message $OutputText -Type 1 -ServerLogFile $ServerLogFile} 
                }
            }
        }
}
if ($DeleteOnlyIfErrorFound -ne "True")
    {
    $OutputText = "User Chose to Delete MWs (if Restriction exist or not) via Params, Moving ahead with Delete Section of Script and will delete any applicable MWs"
    
    if ($ScriptLogging -eq "True"){CMTraceLog -Message $OutputText -Type 1 -ServerLogFile $ServerLogFile}    
    
    if ($DeleteLocalWindows -eq "True")
        {
        $LocalServiceWindows = Get-WMIObject -Namespace 'ROOT\ccm\Policy\Machine\RequestedConfig' -Query 'SELECT * FROM CCM_ServiceWindow WHERE (ServiceWindowType = "1") or (ServiceWindowType = "2") or (ServiceWindowType = "3") or (ServiceWindowType = "4") or (ServiceWindowType = "5") AND PolicySource = "Local" '
        if ($LocalServiceWindows -ne $Null)
            {
            foreach ($LocalSW in $LocalServiceWindows)
                {
                $LocalServiceWindowID = ("ID: " + ($LocalSW).ServiceWindowID + "  Type: " + ($LocalSW).ServiceWindowType)
                $OutputText = "Machine has Local Service Windows: $LocalServiceWindowID"
                if ($ScriptLogging -eq "True"){CMTraceLog -Message $OutputText -Type 1 -ServerLogFile $ServerLogFile}    
                }
            $LocalServiceWindows | Remove-WmiObject
            #Confirm They are Gone
            $LocalServiceWindows = Get-WMIObject -Namespace 'ROOT\ccm\Policy\Machine\RequestedConfig' -Query 'SELECT * FROM CCM_ServiceWindow WHERE (ServiceWindowType = "1") or (ServiceWindowType = "2") or (ServiceWindowType = "3") or (ServiceWindowType = "4") or (ServiceWindowType = "5") AND PolicySource = "Local" '
            if ($LocalServiceWindows -eq $Null)
                {
                $OutputText = "Confirmed all Local Services Windows are Gone"
                if ($ScriptLogging -eq "True"){CMTraceLog -Message $OutputText -Type 1 -ServerLogFile $ServerLogFile} 
                }
            }
        }

    if ($DeleteServerWindows -eq "True")
        {
        $ServerServiceWindows = Get-WMIObject -Namespace 'ROOT\ccm\Policy\Machine\RequestedConfig' -Query 'SELECT * FROM CCM_ServiceWindow WHERE (ServiceWindowType = "1") or (ServiceWindowType = "5") AND PolicySource <> "Local" '
        if ($ServerServiceWindows -ne $Null)
            {
                foreach ($ServerSW in $ServerServiceWindows)
                {
                $ServerServiceWindowsID = ("ID: " + ($ServerSW).ServiceWindowID + "  Type: " + ($ServerSW).ServiceWindowType)
                $OutputText = "Machine has Server Service Windows: $ServerServiceWindowsID"
                if ($ScriptLogging -eq "True"){CMTraceLog -Message  $OutputText -Type 1 -ServerLogFile $ServerLogFile}  
                }
            $ServerServiceWindows | Remove-WmiObject    
            #Confirm They are Gone
            $ServerServiceWindows = Get-WMIObject -Namespace 'ROOT\ccm\Policy\Machine\RequestedConfig' -Query 'SELECT * FROM CCM_ServiceWindow WHERE (ServiceWindowType = "1") or (ServiceWindowType = "5") AND PolicySource <> "Local" '
            if ($ServerServiceWindows -eq $Null)
                {
                $OutputText = "Confirmed all Local Services Windows are Gone"
                if ($ScriptLogging -eq "True"){CMTraceLog -Message  $OutputText -Type 1 -ServerLogFile $ServerLogFile} 
                }
            }
        }


    if ($DeleteEverything -eq "True")
        {
        $AllServiceWindows = Get-WMIObject -Namespace 'ROOT\ccm\Policy\Machine\RequestedConfig' -Query 'SELECT * FROM CCM_ServiceWindow'
        if ($AllServiceWindows  -ne $Null)
            {
            foreach ($AllSW in $AllServiceWindows)
                {
                $AllServiceWindowsID = ("ID: " + ($AllServiceWindows).ServiceWindowID + "  Type: " + ($AllServiceWindows).ServiceWindowType)
                $OutputText = "Machine has Local & Server Service Windows: $ServerServiceWindowsID"
                if ($ScriptLogging -eq "True"){CMTraceLog -Message  $OutputText -Type 1 -ServerLogFile $ServerLogFile}  
                }
            $AllServiceWindows | Remove-WmiObject
            #Confirm They are Gone
            $AllServiceWindows = Get-WMIObject -Namespace 'ROOT\ccm\Policy\Machine\RequestedConfig' -Query 'SELECT * FROM CCM_ServiceWindow'
            if ($AllServiceWindows -eq $Null)
                {
                $OutputText = "Confirmed all Local Services Windows are Gone"
                if ($ScriptLogging -eq "True"){CMTraceLog -Message $OutputText -Type 1 -ServerLogFile $ServerLogFile} 
                }
            }
        }
}    

if ($ScriptLogging -eq "True"){CMTraceLog -Message  "----------Finished Delete Local Service Windows Script on: $env:computername----------" -Type 1 -ServerLogFile $ServerLogFile

As always, if you find any issues, typos, whatever, let me know.
Posted on GARYTOWN.COM

Run PowerShell ISE as System to Test scripts… From Software Center

$
0
0

Yet another post caused by my recent rebuilding of my lab from scratch after I totally hosed my last CM Server.  This time I’m documenting (blogging) a few additional things.

So you write a lot of scripts for ConfigMgr?  Notice that they sometimes don’t perform quite as expected because they run as system instead of a user?  Quick and easy way to make the PowerShell ISE available for you to test running your scripts as System.  Nope, it’s not PSExec… this is even easier.

Super Simple, almost feel it’s not even blog worthy, but here it is anyway.

  • Make a Package, no Content (PowerShell ISE x64)
  • Make a program (RunAsSystem)
    • Command: %SystemRoot%\sysnative\WindowsPowerShell\v1.0\powershell.exe –command "ise"

image

Then Deploy it to a user or user group, very limited test group, as this gives anyone with this deployment full system access to their machine.

image

When you click Install, you’ll see the black command window for a second, then the ISE start launching. Once Launched, you’ll see it is running as System.

image

Now you can test your script under the same context that CM would run this.  I use this all the time to test things I plan to load into the scripts node.

Posted on GARYTOWN.COM

Viewing all 206 articles
Browse latest View live