Requirements:
- Windows 10 ADK (Build 10586) – Download HERE
- Windows 10 ADK Hotfix to fix issue in ADK– Download HERE (We’ll get to this later)
- DaRT Recovery Image Installed –> Part of MDOP
- Windows 10 Media (Build 10586) Mounted
Setup:
ADK 10
DaRT
Launch the MS DaRT Recovery Image Wizard – If you see this error, it’s because of your Powershell group policy, to get around this, open elevated command prompt and do this:
Reg delete HKLM\SOFTWARE\Policies\Microsoft\Windows\Powershell /v ExecutionPolicy /f
– Now try again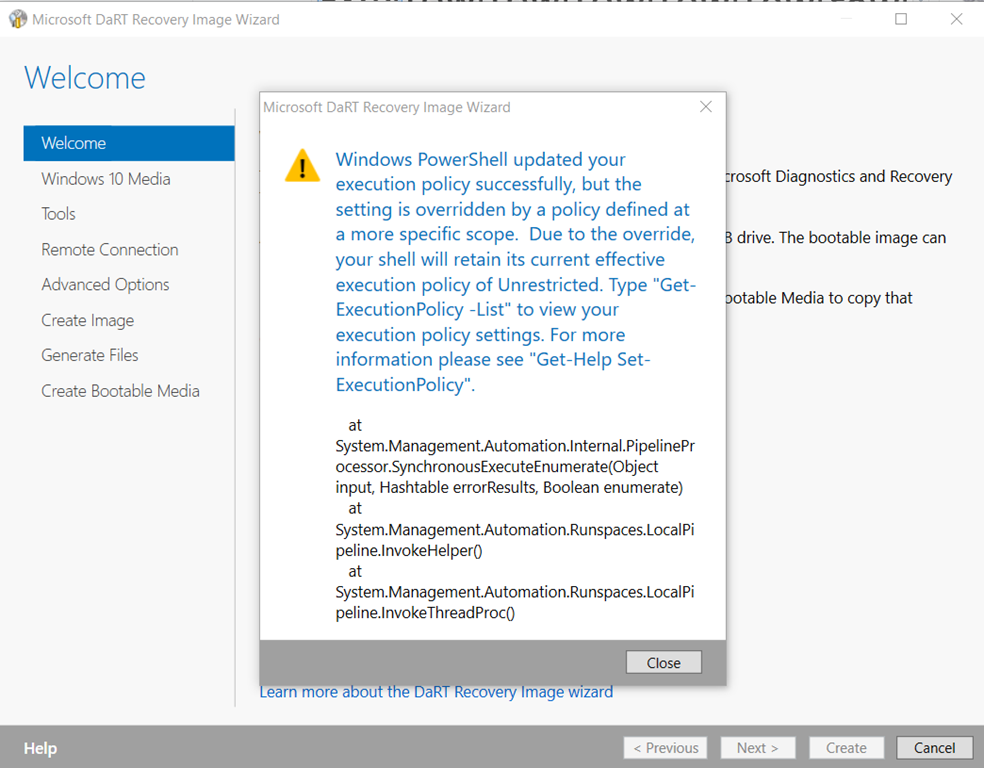
Choose 64-bit Dart Image – I’ve mounted the Windows 10 ISO to the D: drive
You can leave the tools to default 
Check the box “Allow…” and let it default to 3388
Advanced Options, add any Storage & NIC drivers you’ll need & any WinPE addons

Create Image: Select Create WIM, set the path to c:\cabs
– Note, if you want, at this step, you can check the box “Edit image” and then after it a short period, you’ll get the opportunity to add files. I did this to add cmtrace and some other tools into the image
Now wait for a few minutes while it is generated
Adding HotFix to boot.wim (Only if you’re using Windows 10 1511 build 10586)
Extract the HotFix to c:\Cabs (I’m using 7zip)
It will create 2 schema files.

Also create the folder mount (C:\Cabs\Mount)
Make sure your boot.wim file is save to C:\Cabs\DaRT10\x64\boot.wim, you’ll then need to run these commands: ( original documentation here: https://support.microsoft.com/en-us/kb/3143760), this is modified based on where I’ve saved the files in my example.
Run from elevated “Deployment and Imaging Tools Environment” 
- dism /mount-wim /wimfile:C:\Cabs\DaRT10\x64\boot.wim /index:1 /mountdir:C:\Cabs\mount

- icacls C:\Cabs\mount\Windows\System32\schema.dat /save “%temp%\AclFile”

- takeown /F C:\Cabs\mount\Windows\System32\schema.dat /A

- icacls C:\Cabs\mount\Windows\System32\schema.dat /grant BUILTIN\Administrators:(F)

- xcopy “C:\Cabs\schema-x64.dat” C:\Cabs\mount\Windows\System32\schema.dat /Y

- icacls C:\Cabs\mount\Windows\System32\schema.dat /setowner “NT SERVICE\TrustedInstaller”

- icacls C:\Cabs\mount\Windows\System32\ /restore “%temp%\AclFile”

- dism /unmount-wim /mountdir:C:\Cabs\mount /Commit


As you can see, Before:
After: 
Ok, now we have our boot.wim file, it’s time to get it into the OSD process.
In the Standard ConfigMgr MDT Task Sequence, go to the Format and Partition Disk (UEFI)
Change the Windows RE Tools name to WinRE and change the size from 300 to 900
Create a Package with your boot.wim file and three batch files: (Download here)
SetDriveLetterLabel.cmd (This will take the Partition Labeled WinRE and assign letter R)
——-
REM ======start batch script=======
@echo off
setlocal ENABLEDELAYEDEXPANSION
:: Full path to diskpart.exe. Defaults are:
:: Windows 2000: “C:\Program Files\Resource Kit\diskpart.exe”
:: 2003/XP: “C:\windows\system32\diskpart.exe”
set dp=c:\windows\system32\diskpart.exe
:: Volume label
set label=WinRE
:: Temporary command file for diskpart.exe
set dps=”%TEMP%\dp.txt”
echo list volume>%dps%
echo exit>>%dps%
set label_short=%LABEL:~0,11%
if exist %dp% (
for /f “delims=” %%i in (‘%dp% /s %dps%’) do (
set string=%%i
if not “!string:%label_short%=!”==”!string!” (
set volnum=!string:~9,3!
set volnum=!volnum: =!
)
)
if not “!volnum!”==”” (
echo Volume Label: %label%
echo Volume Number: !volnum!
echo select volume !volnum! >>%TEMP%\assignr.txt
echo assign letter=R >>%TEMP%\assignr.txt
%dp% /s %TEMP%\assignr.txt
) else (
echo Cannot find volume with label %label%
)
) else (
echo Cannot find %dp%&goto :EOF
)
REM =======end batch script========
——-
RemoveDriveLetterLabel.cmd (This will remove the drive Letters D/E/R). I was having some computers add a D or E drive based on other factors, so I just added it to this script to remove those letters too.
———
REM ======start batch script=======
@echo off
setlocal ENABLEDELAYEDEXPANSION
:: Full path to diskpart.exe. Defaults are:
:: Windows 2000: “C:\Program Files\Resource Kit\diskpart.exe”
:: 2003/XP: “C:\windows\system32\diskpart.exe”
set dp=c:\windows\system32\diskpart.exe
:: Volume label
set label=WinRE
:: Temporary command file for diskpart.exe
set dps=”%TEMP%\dp.txt”
echo list volume>%dps%
echo exit>>%dps%
set label_short=%LABEL:~0,11%
if exist %dp% (
for /f “delims=” %%i in (‘%dp% /s %dps%’) do (
set string=%%i
if not “!string:%label_short%=!”==”!string!” (
set volnum=!string:~9,3!
set volnum=!volnum: =!
)
)
if not “!volnum!”==”” (
echo Volume Label: %label%
echo Volume Number: !volnum!
echo select volume !volnum! >>%TEMP%\remover.txt
echo remove letter=r >>%TEMP%\remover.txt
echo select volume !volnum! >>%TEMP%\removed.txt
echo remove letter=d >>%TEMP%\removed.txt
echo select volume !volnum! >>%TEMP%\removee.txt
echo remove letter=e >>%TEMP%\removee.txt
%dp% /s %TEMP%\remover.txt
%dp% /s %TEMP%\removed.txt
%dp% /s %TEMP%\removee.txt
) else (
echo Cannot find volume with label %label%
)
) else (
echo Cannot find %dp%&goto :EOF
)
REM =======end batch script========
——-
InstallDartUEFI.cmd (This deletes the old Windows Recovery WIM, creates the new folder structure and copies the boot.wim into place and assigns it as the recovery wim – It calls the script above to remove the drive letter when it’s done.)
——–
REM SetDriveLetterLabel.cmd – Now doing in Previous Step, sets WinRE partition to Letter R
REM Make Directory where DaRT Recovery WIM will be placed
mkdir R:\Recovery\WinRE
REM Copy DaRT Recovery WIM into Recovery Partition
copy boot.wim R:\Recovery\WinRE\winre.wim
REM Set Windows to use the new DaRT Recovery WIM
C:\Windows\System32\ReAgentc.exe /disable
C:\Windows\System32\ReAgentc.exe /setreimage /path R:\Recovery\WinRE /target C:\Windows
C:\Windows\System32\ReAgentc.exe /enable
REM Remove the Drive Letter for the Recovery Partition – Removes Letter R and D/E if exist.
RemoveDriveLetterLabel.cmd
——-
Package Contents: 
In the TS:
In the State Restore Group, add two Steps
- Install WinRE – Dart10 – UEFI – Step1 (cmd /c SetDriveLetterLabel.cmd)

- Install WinRE – Dart10 – UEFI – Step2 (cmd /c InstallDartUEFI.cmd)


After OSD, you can go into your recovery options.. and choose Advanced Startup – Once at the Option Screen, pick Troubleshoot –> Advanced –> Command Prompt


It will now reboot into the Windows Recovery Partition.
You’ll see a prompt for “Would you like to initialize network connectivity..”, click yes
It will now prompt you for your bitlocker Key, if bitlocker is enabled. Enter it and click continue
The Command Prompt will Open, just go ahead and close it.
You will now see options, choose Troubleshoot –> Microsoft Diagnostics and Recovery Toolset will be an option.
Now that you launched DaRT, you’ll have several options available to you, including Remote Connection, which is what I’m using to connect in to grab the screen capture.
Several hand tools built in like LockSmith, to recover Admin Passwords. This is handy if you have LAPS implemented, and the machine is deleted from the domain so you no longer have access to the Admin password.
File Restore in action:
And if you like, you can even add a web browser to your Image, because hey, why not! Pale Moon 64bit seems to work alright.  Just Extract the Program to a folder and copy that folder into your image. Then use Explorer to browse to it.

So there you have it, integrating DaRT 10 into your Windows 10 10586 Deployments
I’ve tested this on Dell Latitude E6540, Precision 7510 & MS Surface Pro. I’ve done this in the Past with DaRT 8 on an entire range of Dell devices without any issues. But I’ve only started to implement this with DaRT10.